
Tuesday, March 15, 2011
Acting to Dialog 2 - Blocking Plus and Polish Pass
The above is the Blocking Plus stage of my second dialog animation. The initial blocking stage is viewable in a previous entry, available here. In this stage, I have begun working on smoothing the animation together in splines, but haven't yet had time to really finesse the motion. I'm mainly trying to get the first set of motion in, to ensure the timing works and the body moves between poses well.
In this pass, I begin working in the graph editor to really focus on getting the motion as smooth and natural as I can. I mainly focused on body mechanics in the feet, hips and torso, as well as tracking the arcs in the punching arm and the head. I'll be making one more pass at this to refine the animation before moving on to my final scene for the class.


Sunday, March 13, 2011
Projects 350 - Week 7 & 8 Progress Journal: Rigging, Skinning, Blend Shapes and Animatics
The past couple of weeks have been a headache, but they've been incredibly productive when I've been able to work. I'm a little behind the projected schedule, but as soon as I can get past this last little hump and get through this upcoming ridiculously busy week, I should be right back on track - I'm both in a wedding and interviewing for a very exciting potential job this coming Thursday, and preparing for both has required a lot of attention that I hoped to devote to this project this last week.
I spent the first part completing the rig, learning the ins and outs of how to set up a biped rig in Maya. This is a very tricky, very technical process, and definitely not my specialty, but it is done now, and very functional.
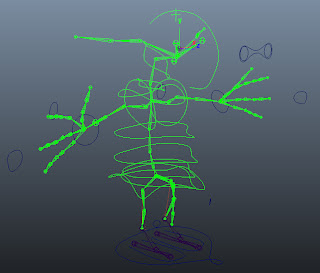
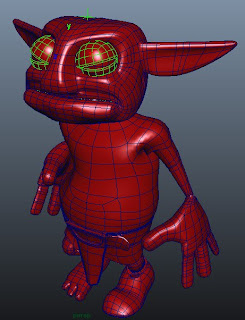
I've got a lot of features built into the rig shown above - both arms and legs are IK driven, and I have a reverse-foot setup, allowing me to keep my heels locked on the ground, roll onto the balls of the feet and do all sorts of other great functions. I have a fully articulated spine, a jaw bone for controlling limited facial animation, duo-jointed ears, bones for the eyes, and a series of bones set up to allow secondary animation on the loincloth.
The eyeballs and eyelids themselves are set up on the eye controllers, and I created a locator object above the character's head to allow him to tip his head to the side without causing odd pivoting or rotation action in the eyes or eyelids.
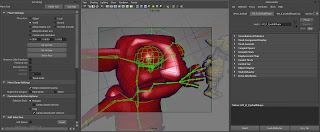
All eye activity is controlled through a series of controllers, using the Set Driven Keys commands in Maya. Through this technique, I can control blinking, eye direction and eyelid rotation, all through a single controller. This functionality was used on the hand controller, as well, allowing me to grab a single object to control the rotation of all finger joints, the spread of the fingers and limited rotation of the palm for exaggerating the form.
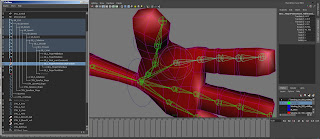
When I was rigging one of the hands, I came across a strange problem - all of the translate options for one of the finger joints was just... missing. It appears that somehow the transform node was, at some point, removed, leaving the only available keyframe-able option as Visibility, not a feature I need a lot in animation. The solution for the problem ended up being rather clever - I created an empty group object, basically a null object in Maya that doesn't have any actual data or anything attached to it beyond transform data. I then unparented the finger joint from its hierarchy, parented the null node onto the joint, and then moved the set back into the hierarchy. A little convoluted, but it solved the problem and allows me full functionality of the hand again.
I've also been working on my skinning, which is proving a little more problematic then I had originally anticipated, but it is coming along. I'm looking up further tutorials and other information from experts to assist, but I've got a good range of poses set up, it's just a matter of figuring out the strategy and learning what the model and rig can and cannot do. In the process, I'm learning a lot about how to better design topology for deformation, as I realize precisely what the theory really means, now that I can see it in action on a model that was this carefully planned.
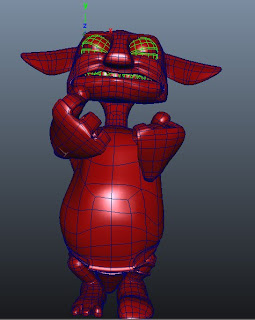
Another success is that I finally got the mouth complete - I was having a huge issue getting teeth to parent correctly to the jaw bone and rotate right. No matter what I did, the teeth seemed to move twice as far as the lip would, meaning his teeth would receed or shoot right out of his mouth. It turns out that the lip was inheriting some of the skin weight from somewhere else, but that has since been remedied and we now have a great looking set of chompers.
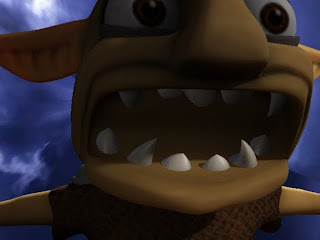
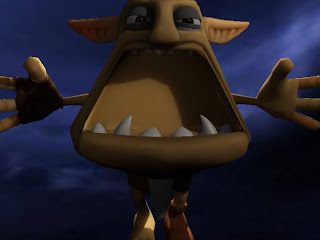
Once I got them in, I ran the character through a number of facial poses, using the blend shapes I had set up and learning how he looks as his face distorts. Turns out? Adorable.
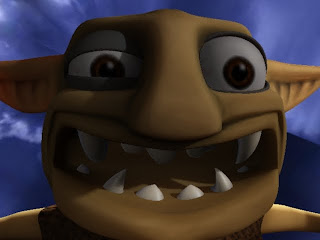
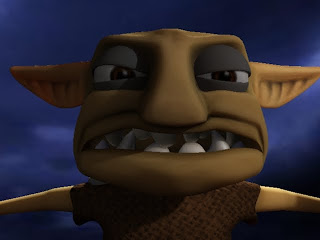
I even discovered, by moving and scaling the jaw bone, some additional functionality that the model possesses that I didn't realize - a happy little accident. Behold:
I've also begun work, and am about halfway done with the initial drawings for, the animatic, a useful stage in which staging and timing issues are resolved before moving toward animation. In doing so, I also created a more resolved version of the background image.
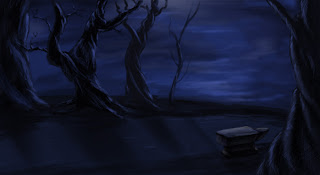
It is still a very loose and unresolved piece, but it solves a lot of the composition problems I had before, and getting the more final model of the environment complete this week, getting grass into the shot and getting hte first lighting pass is going to be very exciting.
Right now, though, I really, really just want to get this skinning done with so I can move on to starting the animation work. Time is running short, and there is a huge amount of work left to do.
I spent the first part completing the rig, learning the ins and outs of how to set up a biped rig in Maya. This is a very tricky, very technical process, and definitely not my specialty, but it is done now, and very functional.

I've got a lot of features built into the rig shown above - both arms and legs are IK driven, and I have a reverse-foot setup, allowing me to keep my heels locked on the ground, roll onto the balls of the feet and do all sorts of other great functions. I have a fully articulated spine, a jaw bone for controlling limited facial animation, duo-jointed ears, bones for the eyes, and a series of bones set up to allow secondary animation on the loincloth.
The eyeballs and eyelids themselves are set up on the eye controllers, and I created a locator object above the character's head to allow him to tip his head to the side without causing odd pivoting or rotation action in the eyes or eyelids.

All eye activity is controlled through a series of controllers, using the Set Driven Keys commands in Maya. Through this technique, I can control blinking, eye direction and eyelid rotation, all through a single controller. This functionality was used on the hand controller, as well, allowing me to grab a single object to control the rotation of all finger joints, the spread of the fingers and limited rotation of the palm for exaggerating the form.

When I was rigging one of the hands, I came across a strange problem - all of the translate options for one of the finger joints was just... missing. It appears that somehow the transform node was, at some point, removed, leaving the only available keyframe-able option as Visibility, not a feature I need a lot in animation. The solution for the problem ended up being rather clever - I created an empty group object, basically a null object in Maya that doesn't have any actual data or anything attached to it beyond transform data. I then unparented the finger joint from its hierarchy, parented the null node onto the joint, and then moved the set back into the hierarchy. A little convoluted, but it solved the problem and allows me full functionality of the hand again.
I've also been working on my skinning, which is proving a little more problematic then I had originally anticipated, but it is coming along. I'm looking up further tutorials and other information from experts to assist, but I've got a good range of poses set up, it's just a matter of figuring out the strategy and learning what the model and rig can and cannot do. In the process, I'm learning a lot about how to better design topology for deformation, as I realize precisely what the theory really means, now that I can see it in action on a model that was this carefully planned.


Another success is that I finally got the mouth complete - I was having a huge issue getting teeth to parent correctly to the jaw bone and rotate right. No matter what I did, the teeth seemed to move twice as far as the lip would, meaning his teeth would receed or shoot right out of his mouth. It turns out that the lip was inheriting some of the skin weight from somewhere else, but that has since been remedied and we now have a great looking set of chompers.

Once I got them in, I ran the character through a number of facial poses, using the blend shapes I had set up and learning how he looks as his face distorts. Turns out? Adorable.


I even discovered, by moving and scaling the jaw bone, some additional functionality that the model possesses that I didn't realize - a happy little accident. Behold:

I've also begun work, and am about halfway done with the initial drawings for, the animatic, a useful stage in which staging and timing issues are resolved before moving toward animation. In doing so, I also created a more resolved version of the background image.

It is still a very loose and unresolved piece, but it solves a lot of the composition problems I had before, and getting the more final model of the environment complete this week, getting grass into the shot and getting hte first lighting pass is going to be very exciting.
Right now, though, I really, really just want to get this skinning done with so I can move on to starting the animation work. Time is running short, and there is a huge amount of work left to do.
Tuesday, February 22, 2011
Acting to Dialog 2 - Blocking Stage
My second attempt at 3d animation to dialog. This is the blocking phase. I'll be pushing it into splines and revising some of the poses and layout based on received critique this week.
Sunday, February 20, 2011
Projects 350 - Week 6 Progress Journal: SSS Shaders and Rigging
Huge amounts of progress this week. I spent a lot of time learning how to use Subsurface Scattering Shaders in Max and Maya, as well as getting my rig prepped and ready for animation and skinning.
Subsurface Scattering Shader Setup
At the beginning of the week, I got a chance to get my diffuse map painted a little, with a start getting the head and hands a little bit more textural. Once I had a decent start, I began testing out the capabilities of the FastSSS shaders in Max, as I had heard they were a little simpler to use, and my finished model hadn't been exported to Maya yet. I played with the settings a bit and was astonished with the result. I quickly built a base specular map by converting my diffuse to greyscale and painting over the parts that needed tweaking (eyes, shoulderpad, etc) and made a rough normal map using the NVidia photoshop plugin. Enjoying the result, I created a quick turn-around set and rendered it out to use as a target for setting up the shader in Maya.
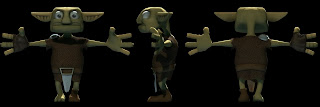
The detail and effect of SSS was astonishing, as it was my first chance to play with it and see the result. Even better, it really didn't add to the render time to any major degree. I burned off another closeup render to use as a target for the Maya shaders and got to work in the other program.
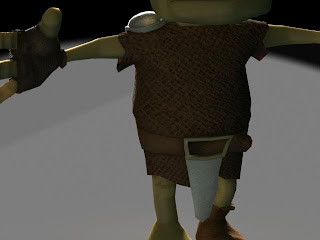
The Maya shader system, being node-based, offered a lot more control but was considerably trickier to get fully functioning. I found a wonderful set of free video tutorials over on Gnomon's site and went through them, taking a couple hours to really make sure I understood the concepts - longer then I hoped to spend, but I think it will be far worth it in terms of quality of the final product gained for the investment.
First I got the basic shader set up and began with the normal map, making sure it was still going to function properly, as the added simulated contour would help inform how the shapes were going to look in the renders, and it would tune the basic three-point lighting system I had set up.
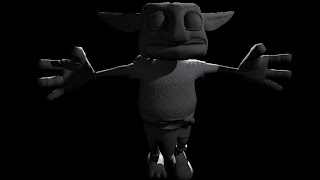
I then began tweaking the different shader settings, beginning with the back scattering.
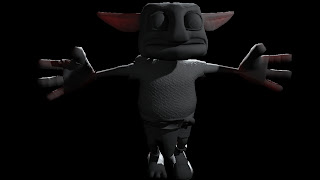
Once I got this blocked in, I recorded the settings, turned it off and blocked in the Epidermal Scattering layer.
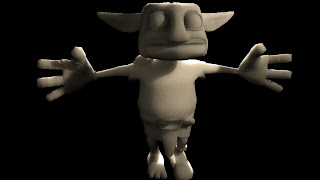
Again, once this was blocked in, I turned it off and began the Subdermal layer.
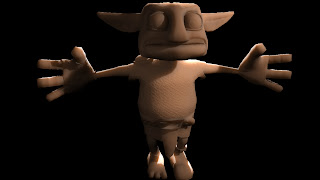
I then began turning them back on, first adding a color map to the backscatter layer.

Then I brought the color map to the other layers and spent time fine-tuning the weights between them.

As you can see, it really knocked back the effectiveness of the shader, especially the normal map, but much of it is due to the fact that the different shader layers need to be painted more to get the most out of this. Also, at this point I didn't have the specular layer applied. I brought in the specular map I had created before and set it up in a rudimentary fashion, and then had to call it a day for this part of the process, as I had an appointment to work on the rigging.

I'll be going through the tutorial more to learn to fine-tune the specular layer, and will be following another tutorial on setting up a shader for the eyes separately from the rest of the mesh. I may also set up a new shader for the shoulder pad and the metal of the loin cloth and belt buckle, and possibly the cloth of the old sack he's wearing. The overall paint still has a lot of work to do, adding details and defining the shapes and contrast, but for a lay-in test this is working very well, in my opinion.
Rigging
I also spent a lot of time this week meeting with various folks about getting my rig set up - I worked with Suzanne Kaufman for a while, who showed me a lot of great stuff, but it was a lot like drinking from a fire hose. She was rushed as she had other appointments to make it to, and she knows a ton about the process and how to do it right, but we just didn't have the time together to really cover everything.
Megan Noble was quite helpful earlier this week, showing me how to create new attributes for controllers, how to orient joints and a number of tricks when it came to setting up the skeleton, as well as just answering questions when I'd get stuck or confused.
Earlier today, I spent a couple hours with Micah Zahm, who was gracious enough to give a couple hours tutoring me on the process of setting up a rig the correct way in Maya, teaching me about simple things I was doing wrong that can break a rig, and the best ways to do it right. It was incredibly helpful, as rigging has always been my downfall before, and he showed me a number of things I found very enlightening about the process.
Already, I'm finding Maya a much better system for all of this stuff then Max, at least in my limited knowledge. I was able to set up a full skeleton pretty quickly, and actually did it a few times before arriving at the final design.
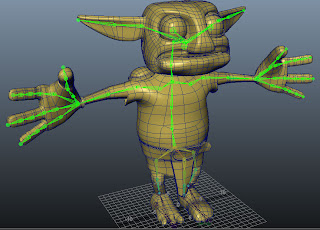
I have a whole suite of features built into the design of the rig that I needed in order to have the most success in the limited amount of action I'm planning for the character. Ideally I'd like to use the character for other things later, but for the time being and my current needs, he's going to work out great, I think.
Micah was very helpful in showing me how to set up a reverse foot rig setup, and helped explain exactly how it works, which is something I've never been able to comprehend precisely before.
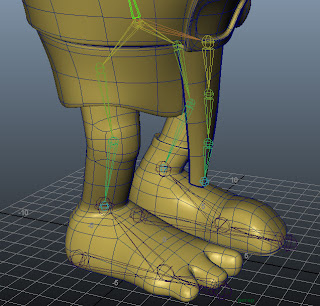
Essentially, the bone at the bottom of the foot doesn't get skinned to the mesh, it sits along the ground to allow the rig to pivot on its heel, but still allow the model to rise up on its toes or rock on the ball of the foot without lifting the foot controller but still moving the ankle IK, making the knee follow, as well.
You may also notice he's got a "wiener bone", as it was jokingly named. That is a series of bones created to be skinned to the loin cloth mesh only, allowing for secondary motion as it flaps around when he walks.
I've also set up a pair of bones for the eyes, which have Aim Constraints for the controllers which float out front.
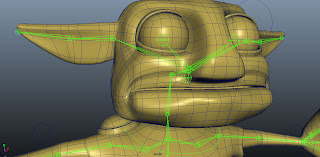
The eyeball mesh is skinned entirely to those joints, and the joints themselves are parented to the head joint to make them follow in space. This lets the eyes rotate around inside the head without moving, but they follow the head as it moves. Just below the head joint is a joint for the jaw. I'm going to build two sets of teeth - one for the top row, which will be parented to the head joint, and one for the bottom row, which will be parented to the jaw joint. This will allow him to open his mouth and have the teeth follow. Finally, I have a pair of joints set up for the ears, allowing a lot of expression and secondary action in them.
I also spent a lot of time getting the hands set up to a controller. The hands themselves are IK controlled, and are moved by the wrist controller. The wrist joint itself has an orientation constraint to the controller, which allows the arms to be moved by grabbing and pulling them around, but keeping the hands oriented to the world, as they should be. This will be a little trickier in the animation, as it can be hard to maintain proper arcs with IK rigs, but they're necessary to lock down the hands in the world space when putting any weight or grabbing onto objects.
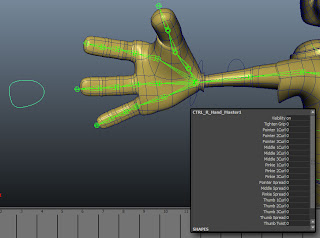
I also added new attributes to the hand controller and mapped them to the fingers, so that instead of grabbing controllers on every little joint I can manipulate them from a single space - much, much easier to work with and animate this way.
I still have a bit more to do to finish the controllers, and have a LOT of work to get the deformer targets built for all the expressions he needs (blinks, scowl, wonderment, confusion, grimace, grin, elation, surprise, etc), but I'm getting much closer, and am moving through a step that was previously daunting, thanks to the help of some very kind folks.
Subsurface Scattering Shader Setup
At the beginning of the week, I got a chance to get my diffuse map painted a little, with a start getting the head and hands a little bit more textural. Once I had a decent start, I began testing out the capabilities of the FastSSS shaders in Max, as I had heard they were a little simpler to use, and my finished model hadn't been exported to Maya yet. I played with the settings a bit and was astonished with the result. I quickly built a base specular map by converting my diffuse to greyscale and painting over the parts that needed tweaking (eyes, shoulderpad, etc) and made a rough normal map using the NVidia photoshop plugin. Enjoying the result, I created a quick turn-around set and rendered it out to use as a target for setting up the shader in Maya.

The detail and effect of SSS was astonishing, as it was my first chance to play with it and see the result. Even better, it really didn't add to the render time to any major degree. I burned off another closeup render to use as a target for the Maya shaders and got to work in the other program.

The Maya shader system, being node-based, offered a lot more control but was considerably trickier to get fully functioning. I found a wonderful set of free video tutorials over on Gnomon's site and went through them, taking a couple hours to really make sure I understood the concepts - longer then I hoped to spend, but I think it will be far worth it in terms of quality of the final product gained for the investment.
First I got the basic shader set up and began with the normal map, making sure it was still going to function properly, as the added simulated contour would help inform how the shapes were going to look in the renders, and it would tune the basic three-point lighting system I had set up.

I then began tweaking the different shader settings, beginning with the back scattering.

Once I got this blocked in, I recorded the settings, turned it off and blocked in the Epidermal Scattering layer.

Again, once this was blocked in, I turned it off and began the Subdermal layer.

I then began turning them back on, first adding a color map to the backscatter layer.

Then I brought the color map to the other layers and spent time fine-tuning the weights between them.

As you can see, it really knocked back the effectiveness of the shader, especially the normal map, but much of it is due to the fact that the different shader layers need to be painted more to get the most out of this. Also, at this point I didn't have the specular layer applied. I brought in the specular map I had created before and set it up in a rudimentary fashion, and then had to call it a day for this part of the process, as I had an appointment to work on the rigging.

I'll be going through the tutorial more to learn to fine-tune the specular layer, and will be following another tutorial on setting up a shader for the eyes separately from the rest of the mesh. I may also set up a new shader for the shoulder pad and the metal of the loin cloth and belt buckle, and possibly the cloth of the old sack he's wearing. The overall paint still has a lot of work to do, adding details and defining the shapes and contrast, but for a lay-in test this is working very well, in my opinion.
Rigging
I also spent a lot of time this week meeting with various folks about getting my rig set up - I worked with Suzanne Kaufman for a while, who showed me a lot of great stuff, but it was a lot like drinking from a fire hose. She was rushed as she had other appointments to make it to, and she knows a ton about the process and how to do it right, but we just didn't have the time together to really cover everything.
Megan Noble was quite helpful earlier this week, showing me how to create new attributes for controllers, how to orient joints and a number of tricks when it came to setting up the skeleton, as well as just answering questions when I'd get stuck or confused.
Earlier today, I spent a couple hours with Micah Zahm, who was gracious enough to give a couple hours tutoring me on the process of setting up a rig the correct way in Maya, teaching me about simple things I was doing wrong that can break a rig, and the best ways to do it right. It was incredibly helpful, as rigging has always been my downfall before, and he showed me a number of things I found very enlightening about the process.
Already, I'm finding Maya a much better system for all of this stuff then Max, at least in my limited knowledge. I was able to set up a full skeleton pretty quickly, and actually did it a few times before arriving at the final design.

I have a whole suite of features built into the design of the rig that I needed in order to have the most success in the limited amount of action I'm planning for the character. Ideally I'd like to use the character for other things later, but for the time being and my current needs, he's going to work out great, I think.
Micah was very helpful in showing me how to set up a reverse foot rig setup, and helped explain exactly how it works, which is something I've never been able to comprehend precisely before.

Essentially, the bone at the bottom of the foot doesn't get skinned to the mesh, it sits along the ground to allow the rig to pivot on its heel, but still allow the model to rise up on its toes or rock on the ball of the foot without lifting the foot controller but still moving the ankle IK, making the knee follow, as well.
You may also notice he's got a "wiener bone", as it was jokingly named. That is a series of bones created to be skinned to the loin cloth mesh only, allowing for secondary motion as it flaps around when he walks.
I've also set up a pair of bones for the eyes, which have Aim Constraints for the controllers which float out front.

The eyeball mesh is skinned entirely to those joints, and the joints themselves are parented to the head joint to make them follow in space. This lets the eyes rotate around inside the head without moving, but they follow the head as it moves. Just below the head joint is a joint for the jaw. I'm going to build two sets of teeth - one for the top row, which will be parented to the head joint, and one for the bottom row, which will be parented to the jaw joint. This will allow him to open his mouth and have the teeth follow. Finally, I have a pair of joints set up for the ears, allowing a lot of expression and secondary action in them.
I also spent a lot of time getting the hands set up to a controller. The hands themselves are IK controlled, and are moved by the wrist controller. The wrist joint itself has an orientation constraint to the controller, which allows the arms to be moved by grabbing and pulling them around, but keeping the hands oriented to the world, as they should be. This will be a little trickier in the animation, as it can be hard to maintain proper arcs with IK rigs, but they're necessary to lock down the hands in the world space when putting any weight or grabbing onto objects.

I also added new attributes to the hand controller and mapped them to the fingers, so that instead of grabbing controllers on every little joint I can manipulate them from a single space - much, much easier to work with and animate this way.
I still have a bit more to do to finish the controllers, and have a LOT of work to get the deformer targets built for all the expressions he needs (blinks, scowl, wonderment, confusion, grimace, grin, elation, surprise, etc), but I'm getting much closer, and am moving through a step that was previously daunting, thanks to the help of some very kind folks.
Wednesday, February 16, 2011
Projects 350 - Testing shaders
Just a quick post - got the first little bit of my diffuse map painted up a little, and started playing with a Subsurface Scattering shader pass. Lots of work left to do to really bring this together, but I'm excited about the results so far.


Sunday, February 13, 2011
Projects 350 - Week 5 Progress Journal, part 2
So I spent a bunch more time this weekend getting the model unwrapped and prepped for texturing. I found a great rainbow and numbered checker pattern so I can be sure I'm distributing the UVs where I need them, and that I'm laying them out in the orientation I want. The unwrap went pretty smoothly, with only a few parts that needed to be overlapped - the legs, arms, ears and eyeballs all share the same UV space, since they can be textured identically. All other features, including hands, the head, the feet and the costume, are textured individually.
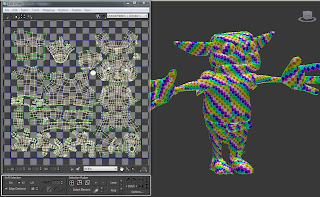
The only parts I'll have to be cautious about in terms of seams are the cheeks and the wrists, for the most part. I had to make cuts there to get the mesh to flatten out without too much distortion, but painting over the seams carefully in photoshop by directly importing the model should help create a fairly seamless paint.
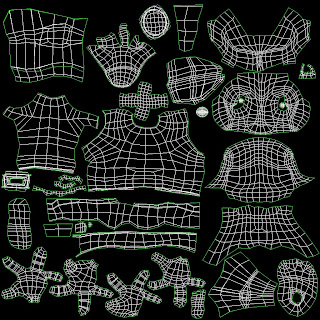
Once I had the UV layouts arranged, I went in and created a flat-color flood, to test out the model and be sure it looked okay.
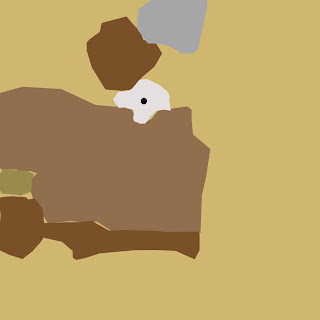
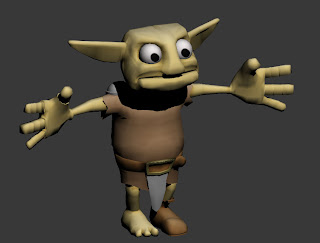
I then applied the texture to the model. Success. So far, things were coming together, and it was exciting to see him with some color on him - it meant I'm that much closer toward my goal.
I then applied an Ambient Occlusion diffuse map to the model and set it up with a number of directional lights to eliminate hard shadows, so that I could render out a burned AO texture pass.
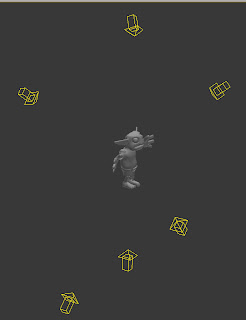
Once rendered, it created a basic shadowed and flat version of the model texture, which I could overlay on the original flood fill to help inform the shape and give the illusion of light hitting the model. This will greatly speed up the texturing process, and give a much better overall look.
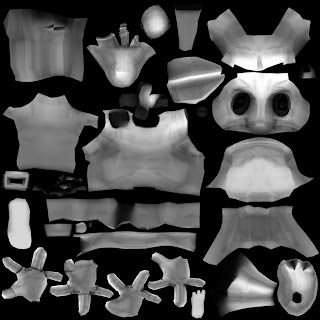
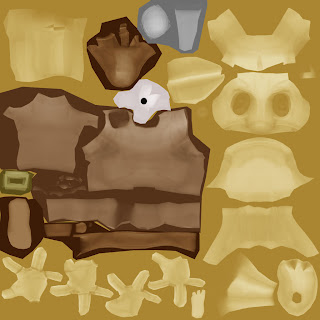
The new texture was then applied to the model, and the components were re-separated from the mesh. I'm now having to step away from the project for a bit, as I've been neglecting my other work to get this far on it, but I'm glad to see so much progress and I'm looking forward to getting to paint him up.

The only parts I'll have to be cautious about in terms of seams are the cheeks and the wrists, for the most part. I had to make cuts there to get the mesh to flatten out without too much distortion, but painting over the seams carefully in photoshop by directly importing the model should help create a fairly seamless paint.

Once I had the UV layouts arranged, I went in and created a flat-color flood, to test out the model and be sure it looked okay.

I then applied the texture to the model. Success. So far, things were coming together, and it was exciting to see him with some color on him - it meant I'm that much closer toward my goal.
I then applied an Ambient Occlusion diffuse map to the model and set it up with a number of directional lights to eliminate hard shadows, so that I could render out a burned AO texture pass.

Once rendered, it created a basic shadowed and flat version of the model texture, which I could overlay on the original flood fill to help inform the shape and give the illusion of light hitting the model. This will greatly speed up the texturing process, and give a much better overall look.


The new texture was then applied to the model, and the components were re-separated from the mesh. I'm now having to step away from the project for a bit, as I've been neglecting my other work to get this far on it, but I'm glad to see so much progress and I'm looking forward to getting to paint him up.

Saturday, February 12, 2011
Projects 350 - Week 5 Progress Journal
Less progress then I'd like, but lots of technical background work, prepping the model for the next phase of development.
I've spent a lot of time working on getting the model cleaned up and making sure the topology is where it needs to be in order to animate well. I'm considering this last version the final, and am moving on to getting it unwrapped, rigged and ready to go.
I spent a little bit of time re-familiarizing myself with projection mapping tools in Max, and was able to create a reasonable tiling texture of chainmail, to be used on my little goblin friend's loincloth, which will add a little fun secondary animation to the model. To do so, I created a torus, rotated it into place and then duplicated it and moved it, creating a single pair of linked rings, then duplicated that set and moved it into place. By doing this step over and over, I created a good base mesh for the chainmail.

Once I got it set up over a plane, I scaled it to the point where I was reasonably sure it would tile well, then used the Render to Texture panel to project the chainmail mesh onto the plane below, creating an alpha, normal and ambient occlusion map set.

This resulted in three 1024x1024 texture maps, one for each of the passes. The transparency map will be hidden in the alpha channel of the diffuse map, once I paint over it. The ambient occlusion pass will be used as the base color channel for a paintover to create the diffuse map, and will help inform the specular map, as well. I'll be laying over rust colors and textures to help that process, when the time comes.

To test the new setup, I imported the file into CrazyBump to ensure it tiled well, and it does, at least reasonably well. It isn't perfect, but for my purposes it'll do well.

I'll be using this method to create better normal maps for a number of the props and pieces of my environment, and using CrazyBump to help create texture maps for much of the process, as well, as it seriously helps speed up the process - making normals for pitted iron for the shoulderpad and anvil, for instance, or the bark of the trees, is a snap in CrazyBump.
I've begun unwrapping the model, and am looking at a number of tutorials and plugins to help expedite the process. There are good ones available at the classily-titled site Poopinmymouth.com. I've gone back and forth on this process a bunch of times, getting mixed results, but I'm determined to have this portion done by the end of the weekend.
Finally, I've also begun rigging the goblin in Maya, and after speaking with a number of fellow students I'm moving forward with the process.

I've got the skeleton itself in place and have begun basic tests for the skinning showing a lot of progress - the joints seem to deform quite well already without having gone into the weighting refinement process, which means that completing the skinning should go pretty well once the rig is complete.


I've started the process of setting up three arm bone sets so that I can have a switch between IK and FK-controlled arms, which will be crucial to the animation I have planned. I've found a good tutorial here that should help the process.
I've also learned how to set up additional attributes and link attributes in Maya to controllers or controller sets, so I can do things like have a single controller for all of the fingers on one hand, for example. This will greatly ease the animation process, and is good experience to get under my belt.
I'm going to keep pushing forward on this stuff all weekend, and I have an appointment for later this coming week with Micah Zahm to help fix any issues I can't resolve myself. All in all, I should be through with this technical hurdle soon, which is exciting - this is what nearly sank my project last semester, and I've learned that it is best to go into something this technical that I'm not particularly strong at by planning carefully and seeking help from the folks that know it well, rather then keep bashing my head against the wall and hoping for the best.
I've spent a lot of time working on getting the model cleaned up and making sure the topology is where it needs to be in order to animate well. I'm considering this last version the final, and am moving on to getting it unwrapped, rigged and ready to go.
I spent a little bit of time re-familiarizing myself with projection mapping tools in Max, and was able to create a reasonable tiling texture of chainmail, to be used on my little goblin friend's loincloth, which will add a little fun secondary animation to the model. To do so, I created a torus, rotated it into place and then duplicated it and moved it, creating a single pair of linked rings, then duplicated that set and moved it into place. By doing this step over and over, I created a good base mesh for the chainmail.

Once I got it set up over a plane, I scaled it to the point where I was reasonably sure it would tile well, then used the Render to Texture panel to project the chainmail mesh onto the plane below, creating an alpha, normal and ambient occlusion map set.

This resulted in three 1024x1024 texture maps, one for each of the passes. The transparency map will be hidden in the alpha channel of the diffuse map, once I paint over it. The ambient occlusion pass will be used as the base color channel for a paintover to create the diffuse map, and will help inform the specular map, as well. I'll be laying over rust colors and textures to help that process, when the time comes.

To test the new setup, I imported the file into CrazyBump to ensure it tiled well, and it does, at least reasonably well. It isn't perfect, but for my purposes it'll do well.

I'll be using this method to create better normal maps for a number of the props and pieces of my environment, and using CrazyBump to help create texture maps for much of the process, as well, as it seriously helps speed up the process - making normals for pitted iron for the shoulderpad and anvil, for instance, or the bark of the trees, is a snap in CrazyBump.
I've begun unwrapping the model, and am looking at a number of tutorials and plugins to help expedite the process. There are good ones available at the classily-titled site Poopinmymouth.com. I've gone back and forth on this process a bunch of times, getting mixed results, but I'm determined to have this portion done by the end of the weekend.
Finally, I've also begun rigging the goblin in Maya, and after speaking with a number of fellow students I'm moving forward with the process.

I've got the skeleton itself in place and have begun basic tests for the skinning showing a lot of progress - the joints seem to deform quite well already without having gone into the weighting refinement process, which means that completing the skinning should go pretty well once the rig is complete.


I've started the process of setting up three arm bone sets so that I can have a switch between IK and FK-controlled arms, which will be crucial to the animation I have planned. I've found a good tutorial here that should help the process.
I've also learned how to set up additional attributes and link attributes in Maya to controllers or controller sets, so I can do things like have a single controller for all of the fingers on one hand, for example. This will greatly ease the animation process, and is good experience to get under my belt.
I'm going to keep pushing forward on this stuff all weekend, and I have an appointment for later this coming week with Micah Zahm to help fix any issues I can't resolve myself. All in all, I should be through with this technical hurdle soon, which is exciting - this is what nearly sank my project last semester, and I've learned that it is best to go into something this technical that I'm not particularly strong at by planning carefully and seeking help from the folks that know it well, rather then keep bashing my head against the wall and hoping for the best.
Subscribe to:
Posts (Atom)