The second piece of animation I did for my Ani399 physicality class was a short, 100-frame parkour piece. First step was to analyze my video reference and create thumbnails, timed out in flash.
Next was to build a stage and block in the animation in Maya.
I then took feedback in class and incorporated the suggestions into the poses, then began splining.
I took further critique from class, changed the set to be something a bit more dramatic, finessed the splines and rendered the scene.

Showing posts with label maya. Show all posts
Showing posts with label maya. Show all posts
Thursday, July 14, 2011


Sunday, April 24, 2011
PRJ350 - Week 14 Progress Journal
What a long, miserable day.
I've spent the last six or seven hours having to render out the first 140 frames of my animation one-by-one by hand, because if I don't, the volumetric "god lights" don't work. It is absolutely maddening, tedious and incredibly boring but it is nearly done.
So, what's changed since last week?
I spent a lot of time cleaning up the poses in my animation and fretting over what to do with the opening of it - the walk and his "surprise" reaction just never worked right for me, and it was getting far too close to the end to fix them. It was upon reflection to this problem that I had an epiphany.
I don't need them at all.
If I start the shot out with the goblin already looking at the sword, we get it. We understand the setup right from the get-go - he's a goblin, this is a sword in a stone. We know how this story goes. I needed to give him some time to consider the sword, to think about it and to ponder his approach, but trying to tell the story with him walking in was trying to tell too much. I needed to introduce his personality in his walk, his mood and why he might be feeling that way, then show a drastic, big change of emotion followed by another drastic change of emotion, from sad to surprised to cautious, all at once, and that is really, really hard. And really, really unnecessary.
I proposed the plan to Pam Matheus and Antony DeFato, both former Disney animators with excellent senses of story and timing, and they agreed it was the right decision. DeFato even brought the idea one step further - start the shot with the camera tight on the character so I could really play up his thinking process, then pull out to reveal the goblin's motivator. Genius.
I deleted my walk and surprise keyframes and got to work adding a good animated hold, using his eyes and slight shifts in the direction of his head to really try to get the subtle animation in to show his thinking process and then proceeded from there. Additionally, I spent a huge amount of time working on getting the spline pass done this week, all while working on wrapping up other assignments (expect more blog posts in the next few days as I finish work for my other classes). I really, really wish I had a few more days for this, or weeks, or months, but I'm happy with what I'm getting so far, and very happy with everything I've learned from the project. I know it isn't the strongest piece in the entire class, but it is the culmination of months of hard work, and I stand behind the result.
I'll have the final posted here in a few days, once I've had time to composite it, build in the title and credits screens and do the post-processing. I'll also follow this post up with a post-mortem, most likely, to review what went well, what didn't and what I'm taking away having gone through the process twice now. For now, I've got to render out the last of the frames (11 left to go, thank god), start the compositing and get some rest before the last big push of the semester.
I've spent the last six or seven hours having to render out the first 140 frames of my animation one-by-one by hand, because if I don't, the volumetric "god lights" don't work. It is absolutely maddening, tedious and incredibly boring but it is nearly done.
So, what's changed since last week?
I spent a lot of time cleaning up the poses in my animation and fretting over what to do with the opening of it - the walk and his "surprise" reaction just never worked right for me, and it was getting far too close to the end to fix them. It was upon reflection to this problem that I had an epiphany.
I don't need them at all.
If I start the shot out with the goblin already looking at the sword, we get it. We understand the setup right from the get-go - he's a goblin, this is a sword in a stone. We know how this story goes. I needed to give him some time to consider the sword, to think about it and to ponder his approach, but trying to tell the story with him walking in was trying to tell too much. I needed to introduce his personality in his walk, his mood and why he might be feeling that way, then show a drastic, big change of emotion followed by another drastic change of emotion, from sad to surprised to cautious, all at once, and that is really, really hard. And really, really unnecessary.
I proposed the plan to Pam Matheus and Antony DeFato, both former Disney animators with excellent senses of story and timing, and they agreed it was the right decision. DeFato even brought the idea one step further - start the shot with the camera tight on the character so I could really play up his thinking process, then pull out to reveal the goblin's motivator. Genius.
I deleted my walk and surprise keyframes and got to work adding a good animated hold, using his eyes and slight shifts in the direction of his head to really try to get the subtle animation in to show his thinking process and then proceeded from there. Additionally, I spent a huge amount of time working on getting the spline pass done this week, all while working on wrapping up other assignments (expect more blog posts in the next few days as I finish work for my other classes). I really, really wish I had a few more days for this, or weeks, or months, but I'm happy with what I'm getting so far, and very happy with everything I've learned from the project. I know it isn't the strongest piece in the entire class, but it is the culmination of months of hard work, and I stand behind the result.
I'll have the final posted here in a few days, once I've had time to composite it, build in the title and credits screens and do the post-processing. I'll also follow this post up with a post-mortem, most likely, to review what went well, what didn't and what I'm taking away having gone through the process twice now. For now, I've got to render out the last of the frames (11 left to go, thank god), start the compositing and get some rest before the last big push of the semester.
Sunday, February 20, 2011
Projects 350 - Week 6 Progress Journal: SSS Shaders and Rigging
Huge amounts of progress this week. I spent a lot of time learning how to use Subsurface Scattering Shaders in Max and Maya, as well as getting my rig prepped and ready for animation and skinning.
Subsurface Scattering Shader Setup
At the beginning of the week, I got a chance to get my diffuse map painted a little, with a start getting the head and hands a little bit more textural. Once I had a decent start, I began testing out the capabilities of the FastSSS shaders in Max, as I had heard they were a little simpler to use, and my finished model hadn't been exported to Maya yet. I played with the settings a bit and was astonished with the result. I quickly built a base specular map by converting my diffuse to greyscale and painting over the parts that needed tweaking (eyes, shoulderpad, etc) and made a rough normal map using the NVidia photoshop plugin. Enjoying the result, I created a quick turn-around set and rendered it out to use as a target for setting up the shader in Maya.
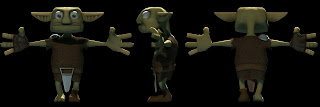
The detail and effect of SSS was astonishing, as it was my first chance to play with it and see the result. Even better, it really didn't add to the render time to any major degree. I burned off another closeup render to use as a target for the Maya shaders and got to work in the other program.
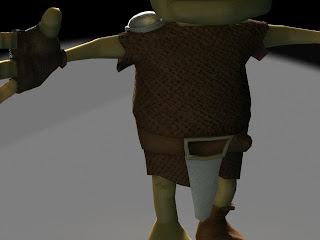
The Maya shader system, being node-based, offered a lot more control but was considerably trickier to get fully functioning. I found a wonderful set of free video tutorials over on Gnomon's site and went through them, taking a couple hours to really make sure I understood the concepts - longer then I hoped to spend, but I think it will be far worth it in terms of quality of the final product gained for the investment.
First I got the basic shader set up and began with the normal map, making sure it was still going to function properly, as the added simulated contour would help inform how the shapes were going to look in the renders, and it would tune the basic three-point lighting system I had set up.
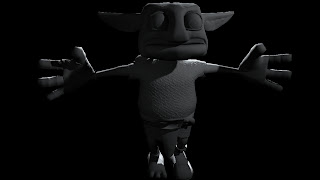
I then began tweaking the different shader settings, beginning with the back scattering.
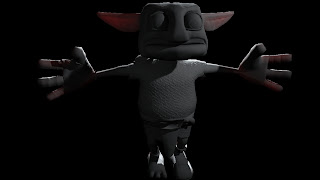
Once I got this blocked in, I recorded the settings, turned it off and blocked in the Epidermal Scattering layer.
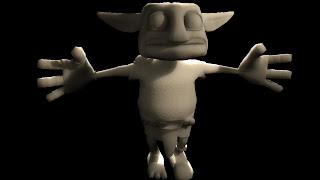
Again, once this was blocked in, I turned it off and began the Subdermal layer.
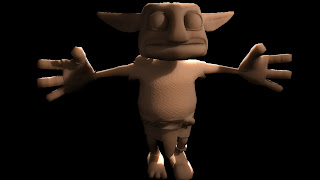
I then began turning them back on, first adding a color map to the backscatter layer.

Then I brought the color map to the other layers and spent time fine-tuning the weights between them.

As you can see, it really knocked back the effectiveness of the shader, especially the normal map, but much of it is due to the fact that the different shader layers need to be painted more to get the most out of this. Also, at this point I didn't have the specular layer applied. I brought in the specular map I had created before and set it up in a rudimentary fashion, and then had to call it a day for this part of the process, as I had an appointment to work on the rigging.

I'll be going through the tutorial more to learn to fine-tune the specular layer, and will be following another tutorial on setting up a shader for the eyes separately from the rest of the mesh. I may also set up a new shader for the shoulder pad and the metal of the loin cloth and belt buckle, and possibly the cloth of the old sack he's wearing. The overall paint still has a lot of work to do, adding details and defining the shapes and contrast, but for a lay-in test this is working very well, in my opinion.
Rigging
I also spent a lot of time this week meeting with various folks about getting my rig set up - I worked with Suzanne Kaufman for a while, who showed me a lot of great stuff, but it was a lot like drinking from a fire hose. She was rushed as she had other appointments to make it to, and she knows a ton about the process and how to do it right, but we just didn't have the time together to really cover everything.
Megan Noble was quite helpful earlier this week, showing me how to create new attributes for controllers, how to orient joints and a number of tricks when it came to setting up the skeleton, as well as just answering questions when I'd get stuck or confused.
Earlier today, I spent a couple hours with Micah Zahm, who was gracious enough to give a couple hours tutoring me on the process of setting up a rig the correct way in Maya, teaching me about simple things I was doing wrong that can break a rig, and the best ways to do it right. It was incredibly helpful, as rigging has always been my downfall before, and he showed me a number of things I found very enlightening about the process.
Already, I'm finding Maya a much better system for all of this stuff then Max, at least in my limited knowledge. I was able to set up a full skeleton pretty quickly, and actually did it a few times before arriving at the final design.
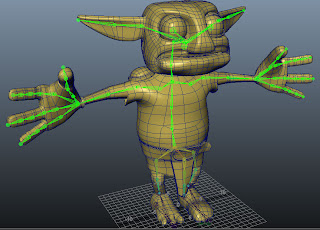
I have a whole suite of features built into the design of the rig that I needed in order to have the most success in the limited amount of action I'm planning for the character. Ideally I'd like to use the character for other things later, but for the time being and my current needs, he's going to work out great, I think.
Micah was very helpful in showing me how to set up a reverse foot rig setup, and helped explain exactly how it works, which is something I've never been able to comprehend precisely before.
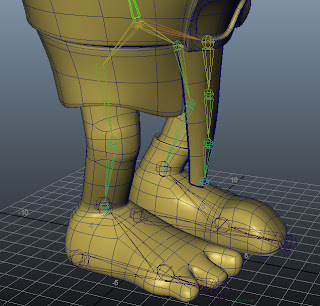
Essentially, the bone at the bottom of the foot doesn't get skinned to the mesh, it sits along the ground to allow the rig to pivot on its heel, but still allow the model to rise up on its toes or rock on the ball of the foot without lifting the foot controller but still moving the ankle IK, making the knee follow, as well.
You may also notice he's got a "wiener bone", as it was jokingly named. That is a series of bones created to be skinned to the loin cloth mesh only, allowing for secondary motion as it flaps around when he walks.
I've also set up a pair of bones for the eyes, which have Aim Constraints for the controllers which float out front.
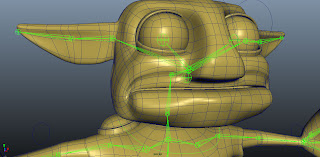
The eyeball mesh is skinned entirely to those joints, and the joints themselves are parented to the head joint to make them follow in space. This lets the eyes rotate around inside the head without moving, but they follow the head as it moves. Just below the head joint is a joint for the jaw. I'm going to build two sets of teeth - one for the top row, which will be parented to the head joint, and one for the bottom row, which will be parented to the jaw joint. This will allow him to open his mouth and have the teeth follow. Finally, I have a pair of joints set up for the ears, allowing a lot of expression and secondary action in them.
I also spent a lot of time getting the hands set up to a controller. The hands themselves are IK controlled, and are moved by the wrist controller. The wrist joint itself has an orientation constraint to the controller, which allows the arms to be moved by grabbing and pulling them around, but keeping the hands oriented to the world, as they should be. This will be a little trickier in the animation, as it can be hard to maintain proper arcs with IK rigs, but they're necessary to lock down the hands in the world space when putting any weight or grabbing onto objects.
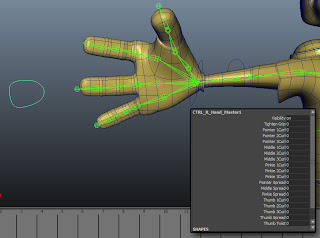
I also added new attributes to the hand controller and mapped them to the fingers, so that instead of grabbing controllers on every little joint I can manipulate them from a single space - much, much easier to work with and animate this way.
I still have a bit more to do to finish the controllers, and have a LOT of work to get the deformer targets built for all the expressions he needs (blinks, scowl, wonderment, confusion, grimace, grin, elation, surprise, etc), but I'm getting much closer, and am moving through a step that was previously daunting, thanks to the help of some very kind folks.
Subsurface Scattering Shader Setup
At the beginning of the week, I got a chance to get my diffuse map painted a little, with a start getting the head and hands a little bit more textural. Once I had a decent start, I began testing out the capabilities of the FastSSS shaders in Max, as I had heard they were a little simpler to use, and my finished model hadn't been exported to Maya yet. I played with the settings a bit and was astonished with the result. I quickly built a base specular map by converting my diffuse to greyscale and painting over the parts that needed tweaking (eyes, shoulderpad, etc) and made a rough normal map using the NVidia photoshop plugin. Enjoying the result, I created a quick turn-around set and rendered it out to use as a target for setting up the shader in Maya.

The detail and effect of SSS was astonishing, as it was my first chance to play with it and see the result. Even better, it really didn't add to the render time to any major degree. I burned off another closeup render to use as a target for the Maya shaders and got to work in the other program.

The Maya shader system, being node-based, offered a lot more control but was considerably trickier to get fully functioning. I found a wonderful set of free video tutorials over on Gnomon's site and went through them, taking a couple hours to really make sure I understood the concepts - longer then I hoped to spend, but I think it will be far worth it in terms of quality of the final product gained for the investment.
First I got the basic shader set up and began with the normal map, making sure it was still going to function properly, as the added simulated contour would help inform how the shapes were going to look in the renders, and it would tune the basic three-point lighting system I had set up.

I then began tweaking the different shader settings, beginning with the back scattering.

Once I got this blocked in, I recorded the settings, turned it off and blocked in the Epidermal Scattering layer.

Again, once this was blocked in, I turned it off and began the Subdermal layer.

I then began turning them back on, first adding a color map to the backscatter layer.

Then I brought the color map to the other layers and spent time fine-tuning the weights between them.

As you can see, it really knocked back the effectiveness of the shader, especially the normal map, but much of it is due to the fact that the different shader layers need to be painted more to get the most out of this. Also, at this point I didn't have the specular layer applied. I brought in the specular map I had created before and set it up in a rudimentary fashion, and then had to call it a day for this part of the process, as I had an appointment to work on the rigging.

I'll be going through the tutorial more to learn to fine-tune the specular layer, and will be following another tutorial on setting up a shader for the eyes separately from the rest of the mesh. I may also set up a new shader for the shoulder pad and the metal of the loin cloth and belt buckle, and possibly the cloth of the old sack he's wearing. The overall paint still has a lot of work to do, adding details and defining the shapes and contrast, but for a lay-in test this is working very well, in my opinion.
Rigging
I also spent a lot of time this week meeting with various folks about getting my rig set up - I worked with Suzanne Kaufman for a while, who showed me a lot of great stuff, but it was a lot like drinking from a fire hose. She was rushed as she had other appointments to make it to, and she knows a ton about the process and how to do it right, but we just didn't have the time together to really cover everything.
Megan Noble was quite helpful earlier this week, showing me how to create new attributes for controllers, how to orient joints and a number of tricks when it came to setting up the skeleton, as well as just answering questions when I'd get stuck or confused.
Earlier today, I spent a couple hours with Micah Zahm, who was gracious enough to give a couple hours tutoring me on the process of setting up a rig the correct way in Maya, teaching me about simple things I was doing wrong that can break a rig, and the best ways to do it right. It was incredibly helpful, as rigging has always been my downfall before, and he showed me a number of things I found very enlightening about the process.
Already, I'm finding Maya a much better system for all of this stuff then Max, at least in my limited knowledge. I was able to set up a full skeleton pretty quickly, and actually did it a few times before arriving at the final design.

I have a whole suite of features built into the design of the rig that I needed in order to have the most success in the limited amount of action I'm planning for the character. Ideally I'd like to use the character for other things later, but for the time being and my current needs, he's going to work out great, I think.
Micah was very helpful in showing me how to set up a reverse foot rig setup, and helped explain exactly how it works, which is something I've never been able to comprehend precisely before.

Essentially, the bone at the bottom of the foot doesn't get skinned to the mesh, it sits along the ground to allow the rig to pivot on its heel, but still allow the model to rise up on its toes or rock on the ball of the foot without lifting the foot controller but still moving the ankle IK, making the knee follow, as well.
You may also notice he's got a "wiener bone", as it was jokingly named. That is a series of bones created to be skinned to the loin cloth mesh only, allowing for secondary motion as it flaps around when he walks.
I've also set up a pair of bones for the eyes, which have Aim Constraints for the controllers which float out front.

The eyeball mesh is skinned entirely to those joints, and the joints themselves are parented to the head joint to make them follow in space. This lets the eyes rotate around inside the head without moving, but they follow the head as it moves. Just below the head joint is a joint for the jaw. I'm going to build two sets of teeth - one for the top row, which will be parented to the head joint, and one for the bottom row, which will be parented to the jaw joint. This will allow him to open his mouth and have the teeth follow. Finally, I have a pair of joints set up for the ears, allowing a lot of expression and secondary action in them.
I also spent a lot of time getting the hands set up to a controller. The hands themselves are IK controlled, and are moved by the wrist controller. The wrist joint itself has an orientation constraint to the controller, which allows the arms to be moved by grabbing and pulling them around, but keeping the hands oriented to the world, as they should be. This will be a little trickier in the animation, as it can be hard to maintain proper arcs with IK rigs, but they're necessary to lock down the hands in the world space when putting any weight or grabbing onto objects.

I also added new attributes to the hand controller and mapped them to the fingers, so that instead of grabbing controllers on every little joint I can manipulate them from a single space - much, much easier to work with and animate this way.
I still have a bit more to do to finish the controllers, and have a LOT of work to get the deformer targets built for all the expressions he needs (blinks, scowl, wonderment, confusion, grimace, grin, elation, surprise, etc), but I'm getting much closer, and am moving through a step that was previously daunting, thanks to the help of some very kind folks.
Saturday, February 12, 2011
Projects 350 - Week 5 Progress Journal
Less progress then I'd like, but lots of technical background work, prepping the model for the next phase of development.
I've spent a lot of time working on getting the model cleaned up and making sure the topology is where it needs to be in order to animate well. I'm considering this last version the final, and am moving on to getting it unwrapped, rigged and ready to go.
I spent a little bit of time re-familiarizing myself with projection mapping tools in Max, and was able to create a reasonable tiling texture of chainmail, to be used on my little goblin friend's loincloth, which will add a little fun secondary animation to the model. To do so, I created a torus, rotated it into place and then duplicated it and moved it, creating a single pair of linked rings, then duplicated that set and moved it into place. By doing this step over and over, I created a good base mesh for the chainmail.

Once I got it set up over a plane, I scaled it to the point where I was reasonably sure it would tile well, then used the Render to Texture panel to project the chainmail mesh onto the plane below, creating an alpha, normal and ambient occlusion map set.

This resulted in three 1024x1024 texture maps, one for each of the passes. The transparency map will be hidden in the alpha channel of the diffuse map, once I paint over it. The ambient occlusion pass will be used as the base color channel for a paintover to create the diffuse map, and will help inform the specular map, as well. I'll be laying over rust colors and textures to help that process, when the time comes.

To test the new setup, I imported the file into CrazyBump to ensure it tiled well, and it does, at least reasonably well. It isn't perfect, but for my purposes it'll do well.

I'll be using this method to create better normal maps for a number of the props and pieces of my environment, and using CrazyBump to help create texture maps for much of the process, as well, as it seriously helps speed up the process - making normals for pitted iron for the shoulderpad and anvil, for instance, or the bark of the trees, is a snap in CrazyBump.
I've begun unwrapping the model, and am looking at a number of tutorials and plugins to help expedite the process. There are good ones available at the classily-titled site Poopinmymouth.com. I've gone back and forth on this process a bunch of times, getting mixed results, but I'm determined to have this portion done by the end of the weekend.
Finally, I've also begun rigging the goblin in Maya, and after speaking with a number of fellow students I'm moving forward with the process.

I've got the skeleton itself in place and have begun basic tests for the skinning showing a lot of progress - the joints seem to deform quite well already without having gone into the weighting refinement process, which means that completing the skinning should go pretty well once the rig is complete.


I've started the process of setting up three arm bone sets so that I can have a switch between IK and FK-controlled arms, which will be crucial to the animation I have planned. I've found a good tutorial here that should help the process.
I've also learned how to set up additional attributes and link attributes in Maya to controllers or controller sets, so I can do things like have a single controller for all of the fingers on one hand, for example. This will greatly ease the animation process, and is good experience to get under my belt.
I'm going to keep pushing forward on this stuff all weekend, and I have an appointment for later this coming week with Micah Zahm to help fix any issues I can't resolve myself. All in all, I should be through with this technical hurdle soon, which is exciting - this is what nearly sank my project last semester, and I've learned that it is best to go into something this technical that I'm not particularly strong at by planning carefully and seeking help from the folks that know it well, rather then keep bashing my head against the wall and hoping for the best.
I've spent a lot of time working on getting the model cleaned up and making sure the topology is where it needs to be in order to animate well. I'm considering this last version the final, and am moving on to getting it unwrapped, rigged and ready to go.
I spent a little bit of time re-familiarizing myself with projection mapping tools in Max, and was able to create a reasonable tiling texture of chainmail, to be used on my little goblin friend's loincloth, which will add a little fun secondary animation to the model. To do so, I created a torus, rotated it into place and then duplicated it and moved it, creating a single pair of linked rings, then duplicated that set and moved it into place. By doing this step over and over, I created a good base mesh for the chainmail.

Once I got it set up over a plane, I scaled it to the point where I was reasonably sure it would tile well, then used the Render to Texture panel to project the chainmail mesh onto the plane below, creating an alpha, normal and ambient occlusion map set.

This resulted in three 1024x1024 texture maps, one for each of the passes. The transparency map will be hidden in the alpha channel of the diffuse map, once I paint over it. The ambient occlusion pass will be used as the base color channel for a paintover to create the diffuse map, and will help inform the specular map, as well. I'll be laying over rust colors and textures to help that process, when the time comes.

To test the new setup, I imported the file into CrazyBump to ensure it tiled well, and it does, at least reasonably well. It isn't perfect, but for my purposes it'll do well.

I'll be using this method to create better normal maps for a number of the props and pieces of my environment, and using CrazyBump to help create texture maps for much of the process, as well, as it seriously helps speed up the process - making normals for pitted iron for the shoulderpad and anvil, for instance, or the bark of the trees, is a snap in CrazyBump.
I've begun unwrapping the model, and am looking at a number of tutorials and plugins to help expedite the process. There are good ones available at the classily-titled site Poopinmymouth.com. I've gone back and forth on this process a bunch of times, getting mixed results, but I'm determined to have this portion done by the end of the weekend.
Finally, I've also begun rigging the goblin in Maya, and after speaking with a number of fellow students I'm moving forward with the process.

I've got the skeleton itself in place and have begun basic tests for the skinning showing a lot of progress - the joints seem to deform quite well already without having gone into the weighting refinement process, which means that completing the skinning should go pretty well once the rig is complete.


I've started the process of setting up three arm bone sets so that I can have a switch between IK and FK-controlled arms, which will be crucial to the animation I have planned. I've found a good tutorial here that should help the process.
I've also learned how to set up additional attributes and link attributes in Maya to controllers or controller sets, so I can do things like have a single controller for all of the fingers on one hand, for example. This will greatly ease the animation process, and is good experience to get under my belt.
I'm going to keep pushing forward on this stuff all weekend, and I have an appointment for later this coming week with Micah Zahm to help fix any issues I can't resolve myself. All in all, I should be through with this technical hurdle soon, which is exciting - this is what nearly sank my project last semester, and I've learned that it is best to go into something this technical that I'm not particularly strong at by planning carefully and seeking help from the folks that know it well, rather then keep bashing my head against the wall and hoping for the best.
Tuesday, February 8, 2011
Acting to Dialog 1 - Completed
I finished my first CG Acting to Dialog project and will be moving on to the next one this week. You can watch the completed product below:
You can see the blocking stage for this animation in an earlier blog post here.
You can see the blocking stage for this animation in an earlier blog post here.
Sunday, February 6, 2011
Projects 350 - Week 4 Progress Journal
At the beginning of this week, I had started with the UV unwrap process when Mark Peasley suggested I revise some of the mesh to optimize it for deformation before going too far into the unwrap. As much as I wanted to just get the model unwrapped and start painting the texture, I knew he was right, so I made sure to put attention into the trouble spots on the mesh, which is where the majority of my attention went this week for this project.

I made sure to add additional loops around the facial features that were going to see the most deformation, as well as optimizing the joints.

I added additional loops around the ball of the foot area, as there was going to be substantial bending here and it needed to work naturally. I also added a "patch" around the knee to help keep the form from flattening oddly when it was bent.

The elbows received the same treatment. I also made sure to optimize the loops around the knuckles and wrists.
I still need to go in and add the geometry for his single glove, but that's a trivial matter of just extruding and pushing the mesh and then pushing a couple verts around to clean it up.

I've also begun testing out my first foray at rigging in Maya, and already really like the setup far more then its Max counterpart. I've got a ways to go, especially getting the IK-FK blends set up properly and the facial deformations in place, but I've begun the research and sketching for that process, as well, and should be good to go in two weeks time.
With that schedule in mind, getting the model unwrapped and a base texture down in the next week or two is a goal I can handle. Getting a block model built of the environment, the props built and the initial shader research all in the next four to five weeks is do-able, and I'll be starting my animation planning in that time frame, leaving me plenty of time to complete the project and hit all of my goals, providing I don't hit any major technical or personal snags along the way.

I made sure to add additional loops around the facial features that were going to see the most deformation, as well as optimizing the joints.

I added additional loops around the ball of the foot area, as there was going to be substantial bending here and it needed to work naturally. I also added a "patch" around the knee to help keep the form from flattening oddly when it was bent.

The elbows received the same treatment. I also made sure to optimize the loops around the knuckles and wrists.
I still need to go in and add the geometry for his single glove, but that's a trivial matter of just extruding and pushing the mesh and then pushing a couple verts around to clean it up.

I've also begun testing out my first foray at rigging in Maya, and already really like the setup far more then its Max counterpart. I've got a ways to go, especially getting the IK-FK blends set up properly and the facial deformations in place, but I've begun the research and sketching for that process, as well, and should be good to go in two weeks time.
With that schedule in mind, getting the model unwrapped and a base texture down in the next week or two is a goal I can handle. Getting a block model built of the environment, the props built and the initial shader research all in the next four to five weeks is do-able, and I'll be starting my animation planning in that time frame, leaving me plenty of time to complete the project and hit all of my goals, providing I don't hit any major technical or personal snags along the way.
Wednesday, January 26, 2011
Projects 350 - Week 2 Progress Journal
This is the last of the old journal entries I need to update to get the journal up to date. I'll have another entry tomorrow documenting this week's progress so far, but this will get the blog fully updated.
Not the most productive week so far, due to considerations for other classes – both CG215 and ANI350 hit very hard with their demands for work due this week, so much of my time was spent on those classes.
Prof. Johnson expressed his concern about the story, in that the technical requirements for the animation were substantial – showing weight and transference of weight is very, very difficult stuff, and he felt that ending the story at the point where the goblin gets the sword was a good “if all else fails” plan.
In a way, I agree that it would be a good failsafe, but I'm confident in my ability to take on this challenge, providing I don't run into major disastrous issues on the technical side as I did last semester. I am really trying to put this piece together to showcase my ability to portray both acting skill through animation as well as raw, technical animation skill, using the techniques learned in ANI300 and those I will be aquiring in ANI350. Additionally, having gone through the process of early vid ref, I think that the needed poses aren't horrendous, and the entire scene plays out in approximately 30 seconds, which is a manageable goal, in my opinion.
Having looked at the technical requirements for what I need to do, I have planned for the following:
I will need to have IK hands, as they will need to be planted in a single location while the body acts independently a number of times, and doing this with FK simply won't do. It was a major issue last semester, and would affect my ability to animate drastically. If I can, I'd like to set up an IK/FK slider system, and I have resources to assist that process, but it is technically demanding, and may be above my ability. It is currently at a “nice to have” feature, while IK is a “must have” feature.
Planning out and doing my thumbnails of the acting is going to be crucial.
I want a chance to explore shaders, including Subsurface Scattering for the skin. Lighting and appearance of the character itself is going to be a lot of fun, but it is crucial that both work well for the scene for the appeal to be there and support the character.
Making sure that the technical aspect works early is the biggest key, so that I can spend at least half of the semester focusing on the animation, the real centerpoint of the entire scene.
I need to get a model sheet and actual 3d models of the two hero props, the anvil and the sword, very soon. The anvil need not be particularly outstanding looking, and shouldn't draw too much attention, but getting the look of the sword right is important. It should be something to be lusted after, and look appropriately regal.
I also received feedback from other students and faculty about my general topology. For the most part, I'm in good shape, but I need to revise the belly a little to provide the most flexibility, and I will need to reconfigure some of the topology of the shoulders by re-routing the edge loops, always a tricky process. So far the goblin is modeled completely in quads, resulting in great subdivision. I'd like to keep it that way.
Not the most productive week so far, due to considerations for other classes – both CG215 and ANI350 hit very hard with their demands for work due this week, so much of my time was spent on those classes.
Prof. Johnson expressed his concern about the story, in that the technical requirements for the animation were substantial – showing weight and transference of weight is very, very difficult stuff, and he felt that ending the story at the point where the goblin gets the sword was a good “if all else fails” plan.
In a way, I agree that it would be a good failsafe, but I'm confident in my ability to take on this challenge, providing I don't run into major disastrous issues on the technical side as I did last semester. I am really trying to put this piece together to showcase my ability to portray both acting skill through animation as well as raw, technical animation skill, using the techniques learned in ANI300 and those I will be aquiring in ANI350. Additionally, having gone through the process of early vid ref, I think that the needed poses aren't horrendous, and the entire scene plays out in approximately 30 seconds, which is a manageable goal, in my opinion.
Having looked at the technical requirements for what I need to do, I have planned for the following:
I will need to have IK hands, as they will need to be planted in a single location while the body acts independently a number of times, and doing this with FK simply won't do. It was a major issue last semester, and would affect my ability to animate drastically. If I can, I'd like to set up an IK/FK slider system, and I have resources to assist that process, but it is technically demanding, and may be above my ability. It is currently at a “nice to have” feature, while IK is a “must have” feature.
Planning out and doing my thumbnails of the acting is going to be crucial.
I want a chance to explore shaders, including Subsurface Scattering for the skin. Lighting and appearance of the character itself is going to be a lot of fun, but it is crucial that both work well for the scene for the appeal to be there and support the character.
Making sure that the technical aspect works early is the biggest key, so that I can spend at least half of the semester focusing on the animation, the real centerpoint of the entire scene.
I need to get a model sheet and actual 3d models of the two hero props, the anvil and the sword, very soon. The anvil need not be particularly outstanding looking, and shouldn't draw too much attention, but getting the look of the sword right is important. It should be something to be lusted after, and look appropriately regal.
I also received feedback from other students and faculty about my general topology. For the most part, I'm in good shape, but I need to revise the belly a little to provide the most flexibility, and I will need to reconfigure some of the topology of the shoulders by re-routing the edge loops, always a tricky process. So far the goblin is modeled completely in quads, resulting in great subdivision. I'd like to keep it that way.
Projects 350 - Character Technical Development
Having hit on the look of the character and having a lot of excitement and interest in the creation of the character model, I got started creating the initial model itself, getting the head blocked out and refined fairly quickly. I also took an export of the model into Zbrush to check for holes and problems successfully, as well as created a rough test of a morph deformation target successfully. It works! I'm on the way, and it feels great.

The head stands at 586 quads (1,172 tris) right now, a very respectable low-poly count for a cinematic like this. I spent a lot of time studying edge loop topology to make sure I'd be able to have a lot of good deformation in the face when it comes time to animate. I bought a couple of books, one on facial animation and rigging and another book on how to set up a character rig in Maya.
My plan for my workflow right now is to build out the models in 3DSMax, then import the models into Maya to rig and skin it. I much prefer the rigging setup in Maya, as well as the animation and lighting tools.
(The following was created a day or so after the post above and was merged with this post as they cover the same topic)

I've finished much of the modeling for the character, having roughed in much of the costume and completed the limbs and extremities. I managed to complete the model without using only quads, which will help subdivision and sculpting for normal maps in Zbrush, if time allows.

I want to have an advisor take a look at my topology before advancing much further to ensure that the deformation will work as I hope it will. I still have yet to model the interior of the mouth or the tongue, but that should be rather simple. Once the design is finalized, I can begin making morph deformation targets for the face to help with the facial animation. I'll be sketching out the needed poses for the face before doing the target poses, and will be sure to work with an advisor to ensure that this is done correctly and wisely.

The head stands at 586 quads (1,172 tris) right now, a very respectable low-poly count for a cinematic like this. I spent a lot of time studying edge loop topology to make sure I'd be able to have a lot of good deformation in the face when it comes time to animate. I bought a couple of books, one on facial animation and rigging and another book on how to set up a character rig in Maya.
My plan for my workflow right now is to build out the models in 3DSMax, then import the models into Maya to rig and skin it. I much prefer the rigging setup in Maya, as well as the animation and lighting tools.
(The following was created a day or so after the post above and was merged with this post as they cover the same topic)

I've finished much of the modeling for the character, having roughed in much of the costume and completed the limbs and extremities. I managed to complete the model without using only quads, which will help subdivision and sculpting for normal maps in Zbrush, if time allows.

I want to have an advisor take a look at my topology before advancing much further to ensure that the deformation will work as I hope it will. I still have yet to model the interior of the mouth or the tongue, but that should be rather simple. Once the design is finalized, I can begin making morph deformation targets for the face to help with the facial animation. I'll be sketching out the needed poses for the face before doing the target poses, and will be sure to work with an advisor to ensure that this is done correctly and wisely.
Projects 350 - Visual Development
Below is another entry from my PRJ350 Progress Journal. This entry details my first pass at designing and planning the over-all look and feel for the scene.
Using the cooler, fairly monochromatic colors of a forest under moonlight, I'll be able to use warmer and more saturated colors on the character and the anvil, as well as higher contrast on the character and “hero prop”, to help draw the eyes onto the story elements of the shot. Using the trees to segment two frames of sky, one on either side of the screen, I can build two distinct stages for the action – one for the goblin to enter to and establish his motivation and character, and a second to frame the hero prop and story moments.

I'll be drawing on my experience in last semester's CG300 class to model and light the scene. Examples of those renders are below.


Using the cooler, fairly monochromatic colors of a forest under moonlight, I'll be able to use warmer and more saturated colors on the character and the anvil, as well as higher contrast on the character and “hero prop”, to help draw the eyes onto the story elements of the shot. Using the trees to segment two frames of sky, one on either side of the screen, I can build two distinct stages for the action – one for the goblin to enter to and establish his motivation and character, and a second to frame the hero prop and story moments.

I'll be drawing on my experience in last semester's CG300 class to model and light the scene. Examples of those renders are below.


Tuesday, January 25, 2011
Acting to Dialog 1 - Blocking Stage
Here's the blocking stage of my first 3d animation set to dialog. Lots to tweak and fix, but I'm fairly happy with the results so far. Hopefully I can keep the quality up as I move into splines this week.
Tuesday, January 18, 2011
Ani300 Animations
Last semester I was lucky enough to take a great animation course from Suzanne Kaufman. In the class, I did a number of animations, including the following, posted in chronological order.
Blocking pass of Walk with Character:
Polish pass of Walk with Character:
Blocking Pass of "Mind the Gap":
Splines Pass of "Mind the Gap":
Final Polish Pass of "Mind the Gap":
Block Pass for "Valley Girl and Bomb":
Final Pass for "Valley Girl and Bomb":
Blocking pass of Walk with Character:
Polish pass of Walk with Character:
Blocking Pass of "Mind the Gap":
Splines Pass of "Mind the Gap":
Final Polish Pass of "Mind the Gap":
Block Pass for "Valley Girl and Bomb":
Final Pass for "Valley Girl and Bomb":
Subscribe to:
Posts (Atom)