Group pitch critique, modeling phase complete & technical research
In my previous entry, I mentioned my vid ref I did for basic acting beats and timing. I'm including it as a YouTube link below.
Began the week with a group critique with Pam Matheus and a number of fellow students. Notes from the critique are below.
- Overall: Greenlight to proceed
- Play up “wants the anvil” story beats and thoughts, helps provide better payoff.
- Belt over shoulder could be problematic. Potentially something to remove? Add to texture?
- Make belt around waist part of core mesh
- Push composition to lead eye better to action
- Too much contrast in upper left, away from action
Thoughts for resolving these issues:
- I'm going to remove the belt from around the shoulder, just to simplify technical problems. I can add it to the texture, and possibly create a normal map to help make it look like it is coming off of the mesh, but it will ease animation greatly
- I'm revisiting some of my composition drawings for the overall design of the scene, keeping the majority of it but working on finding ways of leading the eye.
- Adding belt to base mesh.
- Enforcing the acting in the earliest part of the scene to help establish the character of the goblin and his motivations. I've got plenty of time to do so, my vid ref pass clocked in at 30 seconds, so I'm good to go in that regard.
I completed the final first draft of the base mesh model of the goblin today, unifying the entire model into a single mesh, with the exception of the shoulder pad itself, which will be parented to a special controller or a bone. Should work just fine. Thanks to Josh Jones, I resolved the issue of the topology around the shoulders, and added more edge loops around the belly area to allow better deformation when the character has to bend. Prof. Lu also suggested removing a couple unneeded edge loops to create better, more even quads, and that made good sense.
I deleted the body mesh that would be covered by his shirt/tunic and extruded the mesh out to match the geometry of the shirt. This went swimmingly well – I originally created the shirt by duplicating that part of his body, using the push modifier to increase its size and then pushing and pulling verts to get it into the right shape, which meant that it shared the same number of verts and edge loops as the mesh below, making it a trivial task to attach it later and patch up any potential holes. I used the same extrusion method to create the belt, and may add a few more edge loops to the edges of the belt if I choose to take the model into a subdivision sculpting program like Zbrush, but that's another issue for a later time.
Having it as a single mesh will make skinning much easier a task then I had last semester, as long as I don't run into the same technical problems, such as having the Paint Weights skinning tool crash every time I use it. I've included pictures of the progress below.
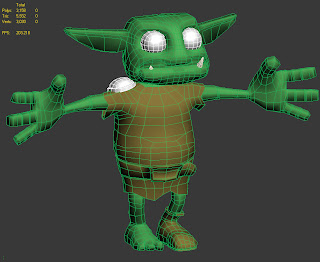 The overall model with the first draft of the final topology, before adding the eyelids. I may extrude the geometry on the right hand to create a fingerless glove, but for the time being I'm happy with the results.
 Detail of the connection of the mesh to the boot at the ankle.
 Detail of the connection of the mesh to the shirt at the neck.
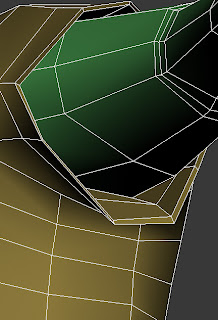 Detail of the shirtsleeve connection to the mesh. These additions keep the entire model watertight, so that there won't be any holes to view. I also connected the underside of the shirt to the hips/legs area, but it is a tricky one to get a clear picture of.
Technical Research – Rigging & Deformers
As I delve into the technical aspects of getting the character rigged, skinned and get the deformation targets built, I'll be adding my notes and plans into this section. My primary resources for this are the books
Body Language: Advanced 3D Character Rigging by Eric Allen & Kelly L. Murdock, and
Stop Staring: Facial Modeling and Animation Done Right by Jason Osipa. I'll also be drawing on the knowledge and experience of faculty and fellow students, and will try to attribute my findings as I write them.
Known Needs:- Fully articulated character with standard rigging setup. Won't need world mover, necessarily, but having one will be useful for future uses with the rig, if I decide to keep it for making other animations, such as for a demo reel.
- Fingers not necessarily rigged individually – he'll only be making gripping shapes, for the most part, although having at least one hand with an articulated pointer finger could help with the humor of the “touching the sword to turn the God light on” situation.
- Facial expressions needed – wonderment, strain/scowl, confusion, glee.
- Face shapes needed – wide and narrow mouth, open and closed mouth, eyebrows raised and lowered. Eyes open/closed. (do I need separate eyelids? What's a good method for making these? Need to research further. Edit: Found a tutorial here. Should do what I needed.)
- May need to model further teeth and possibly a tongue. I created the mouth cavity in the mesh just for this purpose, might as well take advantage of the fact.
- I am going to need IK hands in order to grip the sword and anvil properly. I'd like to have FK hands up to this point, but I don't know if I'm technically able to, it is a bit complex to do so. I'll do some research and leave notes below.
- Need 2 bones for each ear. No problem.
- I'm almost definitely going to need to create different targets for each eyebrow and each corner of the mouth, so I can animate them with a good sense of asymmetry, which will add a lot more appeal to the character.
- I should do some sketches of the different emotions needed, so I can be sure to nail each of the different expressions I need to hit. Drawing out an emotional beat board would be a useful guide to have in the future, regardless. Using the Stop Staring book as well as my copy of Mark Simon's Facial Expressions: A Visual Reference for Artists will prove valuable in this regard. Good reference links to remember: Lackadaisy
- Need to test out a few lighting tricks, such as getting good volumetric light casting with a reasonable render time in a test scene to make sure the God Rays will look good for the scene.
- I need to start researching shaders for the skin and clothing, as they'll need to look good under the lighting conditions, and this project is a good opportunity to explore these methods to enhance the overall look of the scene.
I've begun talking with Prof. Chun Lu, who has extensive experience with rigging in Maya, to help plan out the methods to best approach for the needs expressed above. I'll post progress as I get it.

 Here you can see a comparison of the old head (left) to the new one (right). It is far less flat and much more feminine looking, and fits the character design much better. The ears still need a lot of attention, and the cranium shape isn't quite right, but it is a dramatic improvement overall.
 Another shot of the new head. Some of the overall issues are easier to see here, and hopefully they'll be addressed in ZBrush. Since this shot was taken, I've completed the head shape and addressed some of the issues with the hat and cranium, as well as extending the neck down below the shirt and jacket.
 A look at the rest of the body mesh. Not perfect, by any stretch of the imagination, but it'll do for now. I wish I had more time, and a lot more experience, but that's how things go with a project of this scope and limited time frame.


