It has been another busy week, with a lot of our work being done on behind-the-scenes stuff as we shift into polish mode and try to get the gameplay revisions we've planned completed in time for Alpha.
Alexi has been going back and revisiting a lot of our old props, making sure that the art for them matches the style of our world.
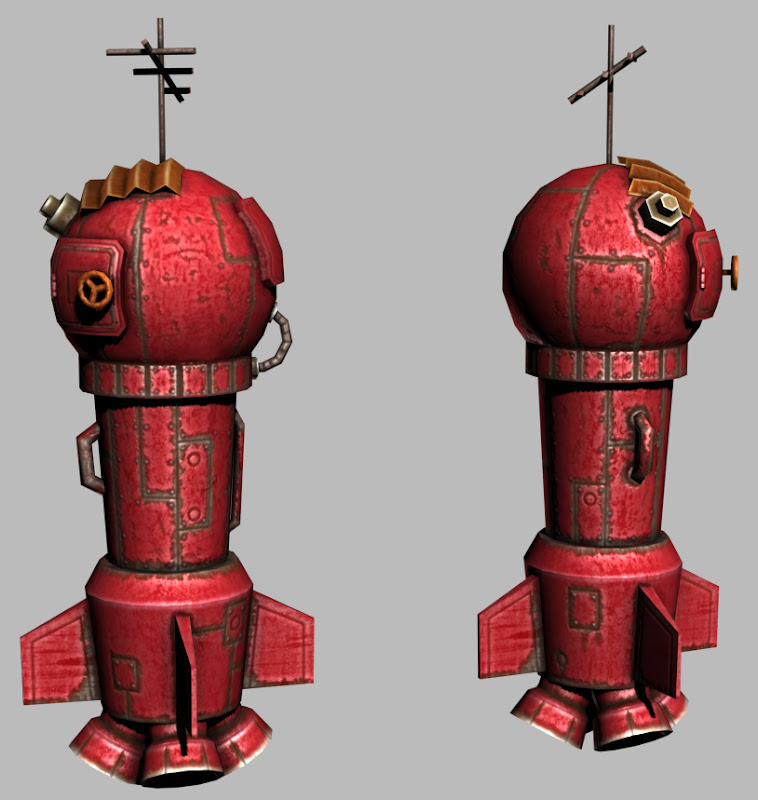
He's gotten a first pass done on the rocket texture sheet. We're tweaking this a bunch, and he's already started on the changes for it, but we'll be getting the animation done for its cut scene this week. Should be fun.
Finally, he also worked on making some more low-poly terrain assets for the game, little bits of weeds and stuff we can put around in our environment to help tell the story.
We got a very cool little script running in our game now that was quick to put together and adds a very subtle but important feature in bringing our characters to life - we can swap textures on the fly now, and we tested it first by having the kids blink their eyes randomly every two to six seconds. It's a little thing, but it really does add to giving them some life. With this feature, we'll be able to swap in other "emotion" texture sheets as needed, like if one of the kids is distressed or if they do something correctly.
Laura has been hard at work getting things prepped for our opening cinematic, and she's really nailing the design of the kids. She has been creating some great storyboards for the cinematic, too.
Steffani created a fantastic rendition of Jenny's workstation that we'll be using for our main menu and in low-poly version in our game. She stayed really true to the original design, and it looks awesome.
Jermz has been creating some fantastic animation work, and we resolved our export issue - like most things, it came down to a single check box we were missing, but that little check box cost us a couple days of heartaches. Oh, technology.
We've started recording and importing sound effects this week, as well, which is going a long way to bring all of our hard work to life.
Finally, we have a whole ton of other code and design changes: getting the boss battle really working, fixing problematic camera issues, getting AI states in, throwing boxes from lane to lane, double jump for Dustin and better jump controls, all kinds of great stuff.
We've got another major deadline looming large, and then we're off to GDC shortly after, so this week is going to be a lot of nose-to-the-grindstone crunch time. We've been very carefully going over our list of features, additions and assets left and how much time we have total, so we're quite aware of the amount of work we have ahead of us, but we're all confident and excited - we're getting so close to getting our game in front of players, and that's the best part of all.
It's been an incredibly busy and productive week. We managed to get the whole team together a couple of times and the unity and motivation between everybody is just outstanding. It's starting to feel like a real studio.
This Friday I was able to volunteer for the Washington Interactive Network'sPower of Play 2012 conference, which was a fantastic experience, getting to hear from VPs and GMs of the region's largest game companies talking about the direction the games industry is heading and all of the incredible support networks available. I can't wait for their next Startup Workshop.
The game has been progressing incredibly fast - we have prototypes working for the tutorial section, the first puzzle and the boss fight, which is very encouraging. We're going to be testing these sections as much as possible this week while we polish the gameplay and get the other two or three puzzles in place, polishing the art and look of the world as we go.
Bobby Simpson, one of our newest members, has been hard at work rewriting the character controller code, to great effect. Already we have a lot more control over the way the player moves through the world and a much better understanding of the underlying code for it. It is great to have some support for Ryan, who has been working so hard on getting everything coded for our designers to get gameplay in place.
We've got the first draft of our dialog script in place now and are revising it as I write this, giving Laura Franke, our Cinematics Artist, something to work from. She's already been hard at work sketching characters and thumbnailing panel ideas, getting a good understanding of the style of our game. She's picking it up very quickly, which is encouraging. We're all excited to see it in play.
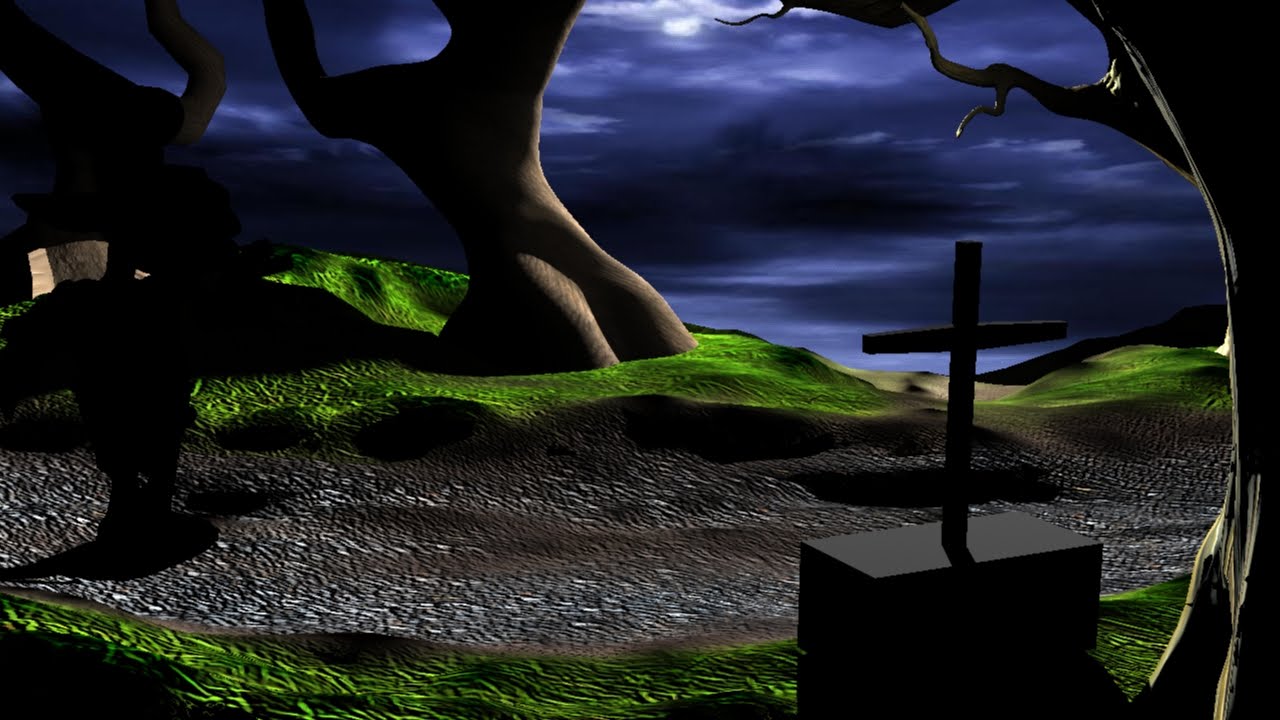
I worked with the game project file this weekend and played with the fog color and set up some particle systems, tinting the smog more brownish and away from the blue. It is already making a big difference. I also modelled up a big trash pile and set it up in the background along with a number of other props. This, combined with a world-sized cloud and dust particle system I built, adds a lot of depth and animation to the game world, giving it a sense of life and place. We'll be revisiting this stuff a lot to get it polished, but the few hours I was able to put in today already show a lot of promise. The plumes of distant smoke were made before the other changes and are looking too blue at the moment, but that's an easy fix.
I also went back and retextured the trunk of the tree to match the style of our game. It looks a lot better already.
Steffani Charano, our new Environment Artist, has been polishing the look of the dumpster and the minicar.
Jermz Gallardo has been doing some great work animating the characters. We ran into an issue on the export for them, but we'll have it resolved tomorrow or Wednesday, as time allows.
He also made some great UI elements that we're incorporating for testing today. We'll have fully animated UI elements in by the end of the week.
Zach Hartlage, our character artist, has shifted to working on more concept art for props and environment assets. He created an absolutely fantastic concept sheet for the work bench that Jenny uses that will also serve as the background for our Main Menu.
I spent time working on the tiling trash bag system earlier this week, as well as the textures for the individual garbage bags. They're not quite done yet, but they're getting a lot closer.
Alexi Gil, our Lead Environment Artist, made some wonderful crates and barrels, mainstays of any self-respecting video game. I used his texture sheet to model up a few pieces of debris from the crates that will be used when the boxes break.
Alexi also modelled up some terrific fast food trash to scatter throughout the world. He's incredibly fast at this stuff, it's been great watching his process evolve this year.
We spent a lot of time working on optimization this week, as well. We got the light baking system in Unity working correctly and were able to create shadow maps for hundreds of objects in our scenes. This was a tremendous boost in terms of performance, and on our test machines we're able to run reliably at around 120fps. We are experimenting with replacing the transparency grasses with polygonal geometry, as a lot of our render time is spent on transparency and alpha sorting, and should have some solid results soon.
It is encouraging seeing the results from our optimization be so promising. It is freeing us up to really focus on density of objects in our world and create the over-the-top feeling of an abandoned, neglected world.
Alexi did some more work revisiting older assets, as well, finishing the dirty texture pass for the schoolbus. He's unwrapped the rocket model and will start texturing it soon.
Beau Bateman, our Lead Artist, is out of town for the weekend, but has been hard at work writing the script for the dialog and opening sequences in our game, as well as giving needed feedback on the status of all of our work, keeping everything in the style of our game world.
Finally, tomorrow we're meeting with Prof. Stephen Saulls, who will be creating the audio assets for our game. We're all very excited to meet with him and get this process moving forward. We've provided him with an exhaustive list of assets, and we'll be discussing priority and style questions tomorrow when we meet with our other advisors. This will give us the last critical element we need to bring our game world to life.
We've got a lot left to do, and deadlines are looming, but our team has been incredibly hard working and efficient, and they are all working together extremely well. Everyone on the team knows who to go to with questions and we all lean on each other to provide our specific sorts of expertise. I am so happy to be working with such great individuals on this project.
Huge amount of progress this week, although much of it isn't readily visible - a lot of behind-the-scenes prep for the next big push - animation blocking.
I began by building out my basic environment, using a technique I learned last semester in CG300 to create a tree, then duplicating it and tweaking it to create a second. Essentially, I built a cylinder, then used a number of latices and nonlinear bend and twist deformers to create the central trunk, then duplicated that shape and scaled it and twisted it to create the branch shapes. I then cut the hole for the branch in the main trunk and combined the meshes, using target weld, and pushed the combined verts around until I had the shape I wanted.
I then exported the tree from Maya into Max and unwrapped it, as I prefer the pelt and relax unwrap tools available there to Maya's unwrap options for organic shapes. I had a good wood bark photo in my reference library that I converted into a tiling texture, then applied it to the re-imported tree shape in Maya, repeating the bark texture as many times as needed to get the scale to look right.
Once that was done, I exported the ground plane into Mudbox to sculpt it, creating a roadway sunk into the ground and a slight valley where the main action was going to play out in the scene, allowing the sword and goblin to break the horizon and be silhouetted against the sky. I then re-imported this into Maya and got it placed where it needed to be.
I then brought in a tree from a previous project to save time and add variety to my scene, one that had been sculpted in Mudbox - it is a bit higher poly then I'd like, but it will look great rendered, and I can always render the background plate separately from the foreground elements, since the lighting won't move - this will likely be a necessity once I get the high-poly grass laid in. I also brought in a copy of the goblin's mesh, to make sure the scale was going to work well. I blocked in the camera and deleted any of the polys from the foreground tree that weren't going to be part of the final render, to cut down on excess geometry,
Finally, I got the textures set up for the ground plane and new trees, as well as the sky background. They're still not perfect, but they're looking okay so far. As I mentioned previously, I'll be painting in high-poly grasses in the foreground and background to help add a better finished look to the scene and create a more realistic environment, but for the blocking phase this is unnecessary, as it creates a huge overhead for rendering and file size, and makes it very difficult to work on the school's sub-par 32 bit systems as they tend to choke on high-poly scenes. I'll likely end up adding the grass fairly soon and making sure it is on a separate layer, so I can turn it off when I don't want it in the scene. It will also make the rendering process easier, having them out of the way.
I also brought in the fully rigged character model at this time, so I could begin test renders. This was a tricky process, as I often lost a lot of the shader information or rigging if it wasn't done correctly. I ended up spending an hour or two cleaning up old garbage left behind in both scenes, lots of hidden geometry and rigging artifacts that aren't used and won't ever be used, to facilitate the process. To get the merge to work best I ended up importing the environment into the rigged character file, rather then the other way around, then going through and carefully removing and renaming things that may present problems in the future.
Once I had the two files properly merged, I had to spend some time fixing some rigging issues and adding the last few controllers I needed for the rig that had gotten missed previously - in particular, I had somehow neglected to add nurbs shapes for controllers for the loincloth and ear joints. Once I had them in place and the model was ready to animate, I wanted to get a rudimentary lighting pass done, as I knew it was another critical, tricky step that I would likely need assistance and feedback on, so better to get it started now.
The first lighting pass was problematic - some of the lights didn't want to work properly, I was inheriting lights from the previous rigging file that weren't visible in my scene view but overpowered everything in my render, and the shader for the goblin had to be rebuilt.
I had a lot of notes left over from last time I built the shader, so it was simple enough to re-link the files and tweak some of the settings to get it in - I need to revisit it soon, however, as the light is passing through the character far too strongly and ruins the effect, causing the little dude to glow a bit.
Once that was corrected, I moved him to the point where he'll first stop and see the sword and anvil (the sword and anvil are currently just placeholder geometry - I need to model them both this week, and they don't really have much on them in terms of lighting).
I also put the character into his first real test pose - I will need to revisit a lot of the blend shapes, I've got a handful of them built now and I imported a dozen or so meshes of the goblin to use for other blend shape targets once I get the basic blocking in, as it will be easier to build target sculpts then, since he is a one-off rig.
And that's where we're at for the moment. I'm hoping to get some more of the base poses in tonight, but I wanted to get this blog post up before midnight, and I've got to go to a quick birthday dinner for a friend. All in all, I'm feeling a lot more confident about the scene and am excited about the next few weeks, although there is a huuuuuge amount of animation to get done for this project, and not a lot of weeks left to do it.
So I got to spend a couple hours updating and revising my dinosaur model today, refining the head and closing it out.
I started by building extruding out the planes around the eye, then shaping the lid to match the contour as it would in real life. For the eyeball, instead of using a standard sphere geometry - they terminate in triangles at the top and bottom, which don't subdivide well, leaving an irregular point - I took a cube and subdivided it into a sphere, ensuring the shape was entirely made of quads.
Here I've continued to finish the sculpting around the eye, getting the lid shaped the way I wanted it.
I then extruded out more planes to complete the cheekbone ridge and start the upper beak. The beak itself still needs a little more work to complete, as it isn't a great job of maintaining the edge loops around to the inside, but it is a complicated area that has a lot of geometry running into a very small area, so I wanted to try to avoid having it get too dense.
Finally, to check my work I set up a Nurbs modifier to simulate the initial step of subdivision and set up a basic pass at smoothing groups. I still need to insert edge loops around the collar to preserve the hard edges and I have a lot of work to do to complete the ridge and the horns that will be extruded out of it, but for a couple hours I got a lot of work done.
I also spent a little bit of time revising the shoulder area, getting a little more muscle definition in. The bulge around the elbow needs to be removed, and there's still a ton of work left, but I'm excited about the project so far - I always love this phase of a project, the exploration and learning process.
So this week I began the process of quad modeling the base mesh for my next ZBrush sculpt in my digital sculpture class. We were supposed to create concept art for a quadruped creature, preferably with a mix of hard and soft surfaces. Immediately, my mind went to "awesome dinosaur with huge ol' guns on it", because... well, because it is awesome. I found lots of great stuff from the old Dino-Riders cartoon for inspiration, and then came across this beauty.
It was created for an upcoming game, Dino D-Day, for release on Steam for PCs April 8th. Man, I fell in love. It is fantastic concept art, wonderfully tied down and realized (I do wish it had a better front view with the whole anatomy, but who am I to complain?). I know I'm not skilled enough to create the concept art to this level, so I spoke with my instructor who said that if I can contact the developer for the game, he'd give me permission to use the art for the project.
I did some research, found the contact email for the developer and sent off an inquiry. The next morning, this email was waiting for me:
Hi Matt,
You have my permission to use our concept art for your project. Thanks for the high praise.
The only request I have is that you don’t show us up! This model’s already built and will soon be unveiled when the game hits Steam at the end of the month.
Best of luck. Send me some pictures when you get it finished!
Abe
So awesome.
I began the research process, looking up as much reference as I could, gathering images and articles from across the web. I gathered images of Styracosaurus, Triceratops and similar dinosaurs, focusing on anatomical reference, scale and color patterns and images to help inform me of their shape - in particular, how the back of the neck connects with the back of the crest, and how their legs are shaped from the front view, as well as general shape were it not wearing a giant mobile gun platform. Also, I looked up similar animals, such as the rhino, and gathered information about how to go about building out the topology, especially around the shoulders, as it would need to deform well, and I've never built a 3d model of a quadruped.
Additionally, in my research, I found that the original piece was created by an artist named Ben Mauro, a former student of DigiPen. All the more reason to really try to nail this project.
With all the research in place, I started the modeling process, using the side view to patch model out the basic topography of the first bit of the dinosaur, then pulling the geometry into place to begin forming the contours.
At this point, my friend Mario Toon gave me some tips on modifying the topology around the shoulder, ensuring the edge loops run concentrically around them to help deformation, should I end up animating the model. Taking his advice, I removed a copy of the front leg and got to work fixing the problem.
I then finished out the basic shape of the front leg - it is going to need a lot of revisiting soon, to get the musculature and shape correct, but at least the topology is all there.
I'll post more as I get the model further along, but I've got other projects due soon that need my attention.
The week has been exceptionally busy, as I've taken on the role of Lead Artist and Producer for our recently named Art Team, Hobos of Might and Magic for my CG350 class, where we're creating a game in the Unity Engine. I'll have more to share about this project shortly, but suffice to say it has taken up the vast majority of my time, and has been a thrilling experience so far.
I spent last night re-working much of the model I began for my CG315 class, in which I was modeling a crust-punk mermaid to take into ZBrush to begin subdivision sculpting. I threw out the old head and redesigned it, and am far happier with the results. I'm still not thrilled with some aspects, such as the hat, and need to connect the hands to the rest of the body and finish out the forearms - the elbow joint could use some attention, as well, but I think much of this work will be completed in ZBrush itself rather then struggling to get it done in Max working against deadline when I have other work that needs attention.
Here you can see a comparison of the old head (left) to the new one (right). It is far less flat and much more feminine looking, and fits the character design much better. The ears still need a lot of attention, and the cranium shape isn't quite right, but it is a dramatic improvement overall.
Another shot of the new head. Some of the overall issues are easier to see here, and hopefully they'll be addressed in ZBrush. Since this shot was taken, I've completed the head shape and addressed some of the issues with the hat and cranium, as well as extending the neck down below the shirt and jacket.
A look at the rest of the body mesh. Not perfect, by any stretch of the imagination, but it'll do for now. I wish I had more time, and a lot more experience, but that's how things go with a project of this scope and limited time frame.
The hand, always a difficult model to make. This is severely revised from the previous model shape, and should work well for the purposes I need it for.
I'll be taking the model into ZBrush this week and beginning my first foray into SubD sculpting. I hope I can do the character justice.
Group pitch critique, modeling phase complete & technical research
In my previous entry, I mentioned my vid ref I did for basic acting beats and timing. I'm including it as a YouTube link below.
Began the week with a group critique with Pam Matheus and a number of fellow students. Notes from the critique are below.
Overall: Greenlight to proceed
Play up “wants the anvil” story beats and thoughts, helps provide better payoff.
Belt over shoulder could be problematic. Potentially something to remove? Add to texture?
Make belt around waist part of core mesh
Push composition to lead eye better to action
Too much contrast in upper left, away from action
Thoughts for resolving these issues:
I'm going to remove the belt from around the shoulder, just to simplify technical problems. I can add it to the texture, and possibly create a normal map to help make it look like it is coming off of the mesh, but it will ease animation greatly
I'm revisiting some of my composition drawings for the overall design of the scene, keeping the majority of it but working on finding ways of leading the eye.
Adding belt to base mesh.
Enforcing the acting in the earliest part of the scene to help establish the character of the goblin and his motivations. I've got plenty of time to do so, my vid ref pass clocked in at 30 seconds, so I'm good to go in that regard.
I completed the final first draft of the base mesh model of the goblin today, unifying the entire model into a single mesh, with the exception of the shoulder pad itself, which will be parented to a special controller or a bone. Should work just fine. Thanks to Josh Jones, I resolved the issue of the topology around the shoulders, and added more edge loops around the belly area to allow better deformation when the character has to bend. Prof. Lu also suggested removing a couple unneeded edge loops to create better, more even quads, and that made good sense.
I deleted the body mesh that would be covered by his shirt/tunic and extruded the mesh out to match the geometry of the shirt. This went swimmingly well – I originally created the shirt by duplicating that part of his body, using the push modifier to increase its size and then pushing and pulling verts to get it into the right shape, which meant that it shared the same number of verts and edge loops as the mesh below, making it a trivial task to attach it later and patch up any potential holes. I used the same extrusion method to create the belt, and may add a few more edge loops to the edges of the belt if I choose to take the model into a subdivision sculpting program like Zbrush, but that's another issue for a later time.
Having it as a single mesh will make skinning much easier a task then I had last semester, as long as I don't run into the same technical problems, such as having the Paint Weights skinning tool crash every time I use it. I've included pictures of the progress below.
The overall model with the first draft of the final topology, before adding the eyelids. I may extrude the geometry on the right hand to create a fingerless glove, but for the time being I'm happy with the results.
Detail of the connection of the mesh to the boot at the ankle.
Detail of the connection of the mesh to the shirt at the neck.
Detail of the shirtsleeve connection to the mesh. These additions keep the entire model watertight, so that there won't be any holes to view. I also connected the underside of the shirt to the hips/legs area, but it is a tricky one to get a clear picture of.
Technical Research – Rigging & Deformers
As I delve into the technical aspects of getting the character rigged, skinned and get the deformation targets built, I'll be adding my notes and plans into this section. My primary resources for this are the books Body Language: Advanced 3D Character Rigging by Eric Allen & Kelly L. Murdock, and Stop Staring: Facial Modeling and Animation Done Right by Jason Osipa. I'll also be drawing on the knowledge and experience of faculty and fellow students, and will try to attribute my findings as I write them.
Known Needs:
Fully articulated character with standard rigging setup. Won't need world mover, necessarily, but having one will be useful for future uses with the rig, if I decide to keep it for making other animations, such as for a demo reel.
Fingers not necessarily rigged individually – he'll only be making gripping shapes, for the most part, although having at least one hand with an articulated pointer finger could help with the humor of the “touching the sword to turn the God light on” situation.
Face shapes needed – wide and narrow mouth, open and closed mouth, eyebrows raised and lowered. Eyes open/closed. (do I need separate eyelids? What's a good method for making these? Need to research further. Edit: Found a tutorial here. Should do what I needed.)
May need to model further teeth and possibly a tongue. I created the mouth cavity in the mesh just for this purpose, might as well take advantage of the fact.
I am going to need IK hands in order to grip the sword and anvil properly. I'd like to have FK hands up to this point, but I don't know if I'm technically able to, it is a bit complex to do so. I'll do some research and leave notes below.
Need 2 bones for each ear. No problem.
I'm almost definitely going to need to create different targets for each eyebrow and each corner of the mouth, so I can animate them with a good sense of asymmetry, which will add a lot more appeal to the character.
I should do some sketches of the different emotions needed, so I can be sure to nail each of the different expressions I need to hit. Drawing out an emotional beat board would be a useful guide to have in the future, regardless. Using the Stop Staring book as well as my copy of Mark Simon's Facial Expressions: A Visual Reference for Artists will prove valuable in this regard. Good reference links to remember: Lackadaisy
Need to test out a few lighting tricks, such as getting good volumetric light casting with a reasonable render time in a test scene to make sure the God Rays will look good for the scene.
I need to start researching shaders for the skin and clothing, as they'll need to look good under the lighting conditions, and this project is a good opportunity to explore these methods to enhance the overall look of the scene.
I've begun talking with Prof. Chun Lu, who has extensive experience with rigging in Maya, to help plan out the methods to best approach for the needs expressed above. I'll post progress as I get it.
Having hit on the look of the character and having a lot of excitement and interest in the creation of the character model, I got started creating the initial model itself, getting the head blocked out and refined fairly quickly. I also took an export of the model into Zbrush to check for holes and problems successfully, as well as created a rough test of a morph deformation target successfully. It works! I'm on the way, and it feels great.
The head stands at 586 quads (1,172 tris) right now, a very respectable low-poly count for a cinematic like this. I spent a lot of time studying edge loop topology to make sure I'd be able to have a lot of good deformation in the face when it comes time to animate. I bought a couple of books, one on facial animation and rigging and another book on how to set up a character rig in Maya.
My plan for my workflow right now is to build out the models in 3DSMax, then import the models into Maya to rig and skin it. I much prefer the rigging setup in Maya, as well as the animation and lighting tools.
(The following was created a day or so after the post above and was merged with this post as they cover the same topic)
I've finished much of the modeling for the character, having roughed in much of the costume and completed the limbs and extremities. I managed to complete the model without using only quads, which will help subdivision and sculpting for normal maps in Zbrush, if time allows.
I want to have an advisor take a look at my topology before advancing much further to ensure that the deformation will work as I hope it will. I still have yet to model the interior of the mouth or the tongue, but that should be rather simple. Once the design is finalized, I can begin making morph deformation targets for the face to help with the facial animation. I'll be sketching out the needed poses for the face before doing the target poses, and will be sure to work with an advisor to ensure that this is done correctly and wisely.