Thursday, January 27, 2011

Projects 350 - Week 3 Progress Journal

Group pitch critique, modeling phase complete & technical research

In my previous entry, I mentioned my vid ref I did for basic acting beats and timing. I'm including it as a YouTube link below.


Began the week with a group critique with Pam Matheus and a number of fellow students. Notes from the critique are below.

  • Overall: Greenlight to proceed
  • Play up “wants the anvil” story beats and thoughts, helps provide better payoff.
  • Belt over shoulder could be problematic. Potentially something to remove? Add to texture?
  • Make belt around waist part of core mesh
  • Push composition to lead eye better to action
  • Too much contrast in upper left, away from action

Thoughts for resolving these issues:

  • I'm going to remove the belt from around the shoulder, just to simplify technical problems. I can add it to the texture, and possibly create a normal map to help make it look like it is coming off of the mesh, but it will ease animation greatly
  • I'm revisiting some of my composition drawings for the overall design of the scene, keeping the majority of it but working on finding ways of leading the eye.
  • Adding belt to base mesh.
  • Enforcing the acting in the earliest part of the scene to help establish the character of the goblin and his motivations. I've got plenty of time to do so, my vid ref pass clocked in at 30 seconds, so I'm good to go in that regard.

I completed the final first draft of the base mesh model of the goblin today, unifying the entire model into a single mesh, with the exception of the shoulder pad itself, which will be parented to a special controller or a bone. Should work just fine. Thanks to Josh Jones, I resolved the issue of the topology around the shoulders, and added more edge loops around the belly area to allow better deformation when the character has to bend. Prof. Lu also suggested removing a couple unneeded edge loops to create better, more even quads, and that made good sense.

I deleted the body mesh that would be covered by his shirt/tunic and extruded the mesh out to match the geometry of the shirt. This went swimmingly well – I originally created the shirt by duplicating that part of his body, using the push modifier to increase its size and then pushing and pulling verts to get it into the right shape, which meant that it shared the same number of verts and edge loops as the mesh below, making it a trivial task to attach it later and patch up any potential holes. I used the same extrusion method to create the belt, and may add a few more edge loops to the edges of the belt if I choose to take the model into a subdivision sculpting program like Zbrush, but that's another issue for a later time.

Having it as a single mesh will make skinning much easier a task then I had last semester, as long as I don't run into the same technical problems, such as having the Paint Weights skinning tool crash every time I use it. I've included pictures of the progress below.
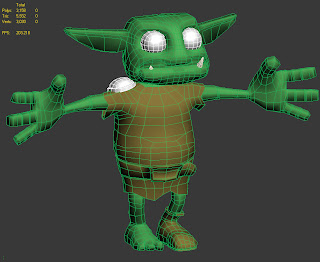
The overall model with the first draft of the final topology, before adding the eyelids. I may extrude the geometry on the right hand to create a fingerless glove, but for the time being I'm happy with the results.

Detail of the connection of the mesh to the boot at the ankle.

Detail of the connection of the mesh to the shirt at the neck.

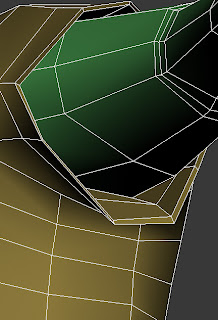
Detail of the shirtsleeve connection to the mesh. These additions keep the entire model watertight, so that there won't be any holes to view. I also connected the underside of the shirt to the hips/legs area, but it is a tricky one to get a clear picture of.


Technical Research – Rigging & Deformers

As I delve into the technical aspects of getting the character rigged, skinned and get the deformation targets built, I'll be adding my notes and plans into this section. My primary resources for this are the books Body Language: Advanced 3D Character Rigging by Eric Allen & Kelly L. Murdock, and Stop Staring: Facial Modeling and Animation Done Right by Jason Osipa. I'll also be drawing on the knowledge and experience of faculty and fellow students, and will try to attribute my findings as I write them.

Known Needs:
  • Fully articulated character with standard rigging setup. Won't need world mover, necessarily, but having one will be useful for future uses with the rig, if I decide to keep it for making other animations, such as for a demo reel.
  • Fingers not necessarily rigged individually – he'll only be making gripping shapes, for the most part, although having at least one hand with an articulated pointer finger could help with the humor of the “touching the sword to turn the God light on” situation.
  • Facial expressions needed – wonderment, strain/scowl, confusion, glee.
  • Face shapes needed – wide and narrow mouth, open and closed mouth, eyebrows raised and lowered. Eyes open/closed. (do I need separate eyelids? What's a good method for making these? Need to research further. Edit: Found a tutorial here. Should do what I needed.)
  • May need to model further teeth and possibly a tongue. I created the mouth cavity in the mesh just for this purpose, might as well take advantage of the fact.
  • I am going to need IK hands in order to grip the sword and anvil properly. I'd like to have FK hands up to this point, but I don't know if I'm technically able to, it is a bit complex to do so. I'll do some research and leave notes below.
  • Need 2 bones for each ear. No problem.
  • I'm almost definitely going to need to create different targets for each eyebrow and each corner of the mouth, so I can animate them with a good sense of asymmetry, which will add a lot more appeal to the character.
  • I should do some sketches of the different emotions needed, so I can be sure to nail each of the different expressions I need to hit. Drawing out an emotional beat board would be a useful guide to have in the future, regardless. Using the Stop Staring book as well as my copy of Mark Simon's Facial Expressions: A Visual Reference for Artists will prove valuable in this regard. Good reference links to remember: Lackadaisy
  • Need to test out a few lighting tricks, such as getting good volumetric light casting with a reasonable render time in a test scene to make sure the God Rays will look good for the scene.
  • I need to start researching shaders for the skin and clothing, as they'll need to look good under the lighting conditions, and this project is a good opportunity to explore these methods to enhance the overall look of the scene.
I've begun talking with Prof. Chun Lu, who has extensive experience with rigging in Maya, to help plan out the methods to best approach for the needs expressed above. I'll post progress as I get it.

Wednesday, January 26, 2011

Projects 350 - Week 2 Progress Journal

This is the last of the old journal entries I need to update to get the journal up to date. I'll have another entry tomorrow documenting this week's progress so far, but this will get the blog fully updated.

Not the most productive week so far, due to considerations for other classes – both CG215 and ANI350 hit very hard with their demands for work due this week, so much of my time was spent on those classes.

Prof. Johnson expressed his concern about the story, in that the technical requirements for the animation were substantial – showing weight and transference of weight is very, very difficult stuff, and he felt that ending the story at the point where the goblin gets the sword was a good “if all else fails” plan.

In a way, I agree that it would be a good failsafe, but I'm confident in my ability to take on this challenge, providing I don't run into major disastrous issues on the technical side as I did last semester. I am really trying to put this piece together to showcase my ability to portray both acting skill through animation as well as raw, technical animation skill, using the techniques learned in ANI300 and those I will be aquiring in ANI350. Additionally, having gone through the process of early vid ref, I think that the needed poses aren't horrendous, and the entire scene plays out in approximately 30 seconds, which is a manageable goal, in my opinion.

Having looked at the technical requirements for what I need to do, I have planned for the following:

I will need to have IK hands, as they will need to be planted in a single location while the body acts independently a number of times, and doing this with FK simply won't do. It was a major issue last semester, and would affect my ability to animate drastically. If I can, I'd like to set up an IK/FK slider system, and I have resources to assist that process, but it is technically demanding, and may be above my ability. It is currently at a “nice to have” feature, while IK is a “must have” feature.
Planning out and doing my thumbnails of the acting is going to be crucial.
I want a chance to explore shaders, including Subsurface Scattering for the skin. Lighting and appearance of the character itself is going to be a lot of fun, but it is crucial that both work well for the scene for the appeal to be there and support the character.
Making sure that the technical aspect works early is the biggest key, so that I can spend at least half of the semester focusing on the animation, the real centerpoint of the entire scene.
I need to get a model sheet and actual 3d models of the two hero props, the anvil and the sword, very soon. The anvil need not be particularly outstanding looking, and shouldn't draw too much attention, but getting the look of the sword right is important. It should be something to be lusted after, and look appropriately regal.

I also received feedback from other students and faculty about my general topology. For the most part, I'm in good shape, but I need to revise the belly a little to provide the most flexibility, and I will need to reconfigure some of the topology of the shoulders by re-routing the edge loops, always a tricky process. So far the goblin is modeled completely in quads, resulting in great subdivision. I'd like to keep it that way.

Projects 350 - Character Technical Development

Having hit on the look of the character and having a lot of excitement and interest in the creation of the character model, I got started creating the initial model itself, getting the head blocked out and refined fairly quickly. I also took an export of the model into Zbrush to check for holes and problems successfully, as well as created a rough test of a morph deformation target successfully. It works! I'm on the way, and it feels great.


The head stands at 586 quads (1,172 tris) right now, a very respectable low-poly count for a cinematic like this. I spent a lot of time studying edge loop topology to make sure I'd be able to have a lot of good deformation in the face when it comes time to animate. I bought a couple of books, one on facial animation and rigging and another book on how to set up a character rig in Maya.

My plan for my workflow right now is to build out the models in 3DSMax, then import the models into Maya to rig and skin it. I much prefer the rigging setup in Maya, as well as the animation and lighting tools.


(The following was created a day or so after the post above and was merged with this post as they cover the same topic)


I've finished much of the modeling for the character, having roughed in much of the costume and completed the limbs and extremities. I managed to complete the model without using only quads, which will help subdivision and sculpting for normal maps in Zbrush, if time allows.


I want to have an advisor take a look at my topology before advancing much further to ensure that the deformation will work as I hope it will. I still have yet to model the interior of the mouth or the tongue, but that should be rather simple. Once the design is finalized, I can begin making morph deformation targets for the face to help with the facial animation. I'll be sketching out the needed poses for the face before doing the target poses, and will be sure to work with an advisor to ensure that this is done correctly and wisely.

Projects 350 - Storyboard Pass

Below is another of my PRJ350 progress journal entries. This one details my first pass at a rough storyboard.


01 – The goblin enters the screen from Stage Left. Seeing a sword stuck in an anvil, he gets naturally curious.


02 – As he reaches for the sword, a shaft of light appears from the heavens. He tentatively accepts this new fact and begins to struggle with pulling the sword free.


03 – The goblin, struggling with all his might, pulls and tugs at the sword, stuck fast in the anvil.


04 – Finally, despite his small stature, he manages to tug the blade free. The resulting momentum, however, propels him backward onto his butt on the roadside.


05 – The goblin shakes his head and comes to his senses. Realizing his situation, he beams at his luck, and then, to our astonishment, pitches the new-found blade into the bushes.


06 – The goblin's true intentions are revealed as he grabs the heavy anvil and struggles to carry it off-screen Stage Right.

Projects 350 - Visual Development

Below is another entry from my PRJ350 Progress Journal. This entry details my first pass at designing and planning the over-all look and feel for the scene.

Using the cooler, fairly monochromatic colors of a forest under moonlight, I'll be able to use warmer and more saturated colors on the character and the anvil, as well as higher contrast on the character and “hero prop”, to help draw the eyes onto the story elements of the shot. Using the trees to segment two frames of sky, one on either side of the screen, I can build two distinct stages for the action – one for the goblin to enter to and establish his motivation and character, and a second to frame the hero prop and story moments.


I'll be drawing on my experience in last semester's CG300 class to model and light the scene. Examples of those renders are below.


Projects 350 - Character Visual Development

Below is another excerpt from my PRJ350 Progress Journal. This entry is about the visual development of the character itself.

I initially designed the character after the Warhammer-styled goblins, going for sort of a mean, tough and realistic look, trying to develop a highly detailed sort of character the type of which you might see in a video game.


I developed the first iteration of this character after going through a few different initial sketches, then spent time painting it up in photoshop as a greyscale rendered sketch to figure out the dimensionality of the forms and the contrast needed to make each area readable easily. Unfortunately, I just wasn't drawn to the character as much as I'd like, and once I saw what some of the other students were working on, I went back to the drawing board with a new inspiration, wanting to build a character with more appeal and interest in the design.


After a number of sketches, I hit on the following design, which I inked down a turn-around and build a color comp layout, utilizing a number of color combinations to figure out what might look the best in the scene.


I really like the new character and it feels like a big break from work I've done in the past and appeals to my sensibility of animation and design. I think this will help hold my attention and interest a lot more.

I've shown the color comp to a number of fellow students, professors and friends that aren't trained artists to get a wide range of opinions. I have been getting a lot of interest and reaction to numbers 5, 6, 9, 11 and 12. I think, personally, I'm leaning toward 5 and 6, but I want to give it a few more days to gather up more opinions before making any final decision. Creating textures for the character is still a long ways away, anyway.

Projects 350 - Story Pitch and Beat Analysis

For my second semester Junior Project, we keep a weekly progress journal defining our progress and documenting our process. I was keeping it in a word doc, but decided to move it to the blog to share the progress of the project. I'll be updating this at least once a week until the project is done.

For the class, we have to create an animated short from scratch, using Maya, Max and other software. We start by building out a story and storyboarding it out, analyzing the beats and making sure everything works while we build out character analysis and art, then model, rig, skin and texture the character or characters, build and light the scene and then animate the entire thing. Depending on our focus, our scene can be between 15 and 45 seconds.

Below is the first entry for the project, detailing my story, breaking it down to a Logline, and then the first pass at analyzing the beats of the story itself.


Story – Pitch and Beat Analysis

Shot opens on a moonlit roadside exterior, somewhere in a thin forest. An ancient sword sticks out of an anvil at the side of the road, an old twisted fence surrounding it. Grass has grown high after years of neglect. Clearly no man has been able to free the sword from the anvil in a very, very long time.

A small goblin coming down the road appears in the left of the shot and, just as he's passing the sword, spots it. He stops to examine the object and gets nearer, getting a good look at it. As he touches it, a beam of light illuminates him. Clearly he is destined by the Gods to be the next great leader of men. He decides to try his brawn and grabs it by the grip, jerking it upward. It doesn't budge. He tries again, both hands on the grip, and it refuses to budge. Grabbing it by the cross guard, he strains and bends and jerks the sword as hard as he possibly can. Finally it comes free and he falls to the ground, the sword in his lap.

Coming to his senses on the ground, the goblin shakes his head, then realizes what he's done. He leaps to his feet, elated, and tosses the sword away into the grass. The beam of light immediately fades as he runs over and grabs his new-found anvil and drags it off screen right.


Logline (story pitch in 25 words or less)

A goblin, finding a sword in an anvil, pulls the sword out but discards it for the anvil itself.


Story Beats

Opening shot: sword stuck in an anvil beside a road under moonlight. Goblin enters screen left.

  • Goblin notices sword.
  • Goblin approaches cautiously, examining sword in anvil.
  • Goblin touches it tentatively. Shaft of light appears above him.
  • Goblin recoils from anvil, cautiously.
  • Goblin touches again.
  • Goblin decides it is safe and grabs the handle, jerking upward swiftly. Sword doesn't budge.
  • Goblin grabs with both hands and pulls hard but sword doesn't budge.
  • Goblin lets go of sword, then musters his strength.
  • Goblin grabs sword by the cross guard, steps onto anvil and pulls with all his might.
  • After a long pull, goblin frees the sword from the anvil. Resulting forces goblin to reel back and fall onto his butt with sword across his lap.
  • Goblin shakes off the resulting confusion, notices sword in lap, and jumps to feet.
  • Goblin pitches sword off-camera into the weeds and approaches anvil, excited.
  • Goblin grabs the anvil and, straining, lifts it, dragging it off screen right.

Tuesday, January 25, 2011

Acting to Dialog 1 - Blocking Stage

Here's the blocking stage of my first 3d animation set to dialog. Lots to tweak and fix, but I'm fairly happy with the results so far. Hopefully I can keep the quality up as I move into splines this week.

More concept art.

I decided I wasn't particularly happy with the ork concept art for ZBrush, so I went back and grabbed a piece I did last year for my concept art class. The ork was too generic and not particularly inspired, due to the rush in creation, but I had more time to spend developing the character and its backstory, and hit on something I thought was interesting and creative with Ann Enemy, the crust punk mermaid.


There's actually quite a bit of backstory about Ann Enemy I created. She's the little sister of an alternate version of the Little Mermaid. In this version, their father Neptune, known to enjoy his drink and possessing a legendary temper, was an abusive father, and so rather the Little Mermaid escaped to land, bargaining with a sea witch for legs not to pursue true love but to get away from the abuse, leaving behind her little sister. Ann, following the lead of her older sibling, escaped as well, but wasn't as fortunate as her sister when it came to getting legs. Instead she came ashore in Texas, leaving the Gulf of Mexico, and was taken in by a group of tramps who hopped trains and rode the rails across the continent. There she learned to embrace her new life and the anonymity it provided.

Much of the reference came from a wonderful archives of photos by Mike Brodie, aka Polaroid Kidd. I've also found a wonderful model from the 3DSK archives, a young lady named Mary, that is standing in as my anatomy reference model.

I've gotten a start in modeling out the head so far, and will be detailing out the body soon, getting the rough quad model blocked out so I can begin subdivision and sculpting in ZBrush. I'll post progress as I go.