First pass at blocking to dialog, this time with a longer scene. I decided to forego my usual approach and block it in straight-ahead, setting poses on twos and fours, for the most part. I've got to tone down a little of the motion and add a bit more gesture to it, but I'm pretty happy with it so far. Audio is a clip by Johnathan Winters in Its A Mad, Mad, Mad, Mad World, downloaded from MovieWAVS.com.

Tuesday, April 5, 2011
Sunday, April 3, 2011
PRJ350 - Week 11 Progress Journal
Animation Blocking
I spent some time working on getting the base poses down for my character's initial walk-on before I realized I was being too hasty - I wasn't following my vid ref or my thumbnails, and with the complexity and length of the animation I had ahead of me, I really needed to have a better roadmap. To this end, I took my original vid ref into photoshop and began tracing over each major key pose onto unique layers. Doing this gave me a better insight to the lines of action in the pose and was a much more accurate and quick way to sketch out the poses then it would be to do so by hand on paper just using the video as reference.


I spent some time working on getting the base poses down for my character's initial walk-on before I realized I was being too hasty - I wasn't following my vid ref or my thumbnails, and with the complexity and length of the animation I had ahead of me, I really needed to have a better roadmap. To this end, I took my original vid ref into photoshop and began tracing over each major key pose onto unique layers. Doing this gave me a better insight to the lines of action in the pose and was a much more accurate and quick way to sketch out the poses then it would be to do so by hand on paper just using the video as reference.


Once I had these initial sketches, I composited them to the sheets above and printed them off. I also began adding them to Flash on the original frame numbers so that I could watch how they moved. This is a lengthy process, so I only got the first portion done, but it is very effective. One benefit of this process is I can quickly and easily play with timing, rather then trying to push and pull dozens of keyed object keyframes in Maya.
Once I have a little more time, I can start playing with the timing and get the rest of the frames in, but I wanted to make sure I had a chance to work on getting initial poses into Maya. I brought up my animation file and worked on getting the first pose right - it tends to be one of the most important ones. In the case of my animation, I actually started with the second pose, the first that the goblin is fully on-screen. I can work backward to have him walk on, but I needed to ensure that I had the right starting position figured out.
I then worked on following my thumbnail roadmap, being careful to exaggerate each pose to really enhance the action and to fit better with the character's proportions and anatomy, and really try to make sure I had the right arcs in place for the IK hands - a tricky process. I got the first part of the walk in, his notice and take and his approach blocked in after long hours of moving him around, and already am noticing severe issues with the skinning I'll have to address - this was part of my plan, as I knew they'd start making themselves more noticed once I started the actual animation, and I'll be working on them soon enough.
All told, things are coming along well, and the animation is working out okay, although I'm already noticing major problems with the timing. The beginning of this week will be spent getting the final models for the props in, getting the lighting resolved and blocking in the next portion of the animation. I'm right in the thick of crunch time now, so everything has to really count, but I'm really excited to see the little guy coming to life.
Sunday, March 27, 2011
PRJ350 - Week 10 Progress Journal
Huge amount of progress this week, although much of it isn't readily visible - a lot of behind-the-scenes prep for the next big push - animation blocking.
I began by building out my basic environment, using a technique I learned last semester in CG300 to create a tree, then duplicating it and tweaking it to create a second. Essentially, I built a cylinder, then used a number of latices and nonlinear bend and twist deformers to create the central trunk, then duplicated that shape and scaled it and twisted it to create the branch shapes. I then cut the hole for the branch in the main trunk and combined the meshes, using target weld, and pushed the combined verts around until I had the shape I wanted.
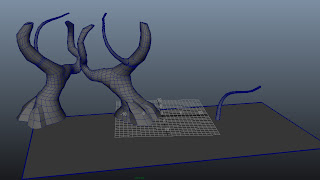
I then exported the tree from Maya into Max and unwrapped it, as I prefer the pelt and relax unwrap tools available there to Maya's unwrap options for organic shapes. I had a good wood bark photo in my reference library that I converted into a tiling texture, then applied it to the re-imported tree shape in Maya, repeating the bark texture as many times as needed to get the scale to look right.

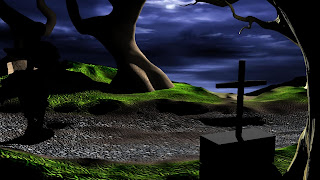
Once that was done, I exported the ground plane into Mudbox to sculpt it, creating a roadway sunk into the ground and a slight valley where the main action was going to play out in the scene, allowing the sword and goblin to break the horizon and be silhouetted against the sky. I then re-imported this into Maya and got it placed where it needed to be.
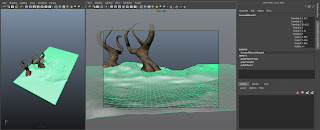
I then brought in a tree from a previous project to save time and add variety to my scene, one that had been sculpted in Mudbox - it is a bit higher poly then I'd like, but it will look great rendered, and I can always render the background plate separately from the foreground elements, since the lighting won't move - this will likely be a necessity once I get the high-poly grass laid in. I also brought in a copy of the goblin's mesh, to make sure the scale was going to work well. I blocked in the camera and deleted any of the polys from the foreground tree that weren't going to be part of the final render, to cut down on excess geometry,
Finally, I got the textures set up for the ground plane and new trees, as well as the sky background. They're still not perfect, but they're looking okay so far. As I mentioned previously, I'll be painting in high-poly grasses in the foreground and background to help add a better finished look to the scene and create a more realistic environment, but for the blocking phase this is unnecessary, as it creates a huge overhead for rendering and file size, and makes it very difficult to work on the school's sub-par 32 bit systems as they tend to choke on high-poly scenes. I'll likely end up adding the grass fairly soon and making sure it is on a separate layer, so I can turn it off when I don't want it in the scene. It will also make the rendering process easier, having them out of the way.
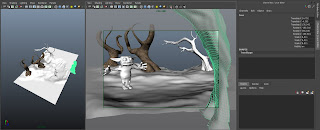
I also brought in the fully rigged character model at this time, so I could begin test renders. This was a tricky process, as I often lost a lot of the shader information or rigging if it wasn't done correctly. I ended up spending an hour or two cleaning up old garbage left behind in both scenes, lots of hidden geometry and rigging artifacts that aren't used and won't ever be used, to facilitate the process. To get the merge to work best I ended up importing the environment into the rigged character file, rather then the other way around, then going through and carefully removing and renaming things that may present problems in the future.
Once I had the two files properly merged, I had to spend some time fixing some rigging issues and adding the last few controllers I needed for the rig that had gotten missed previously - in particular, I had somehow neglected to add nurbs shapes for controllers for the loincloth and ear joints. Once I had them in place and the model was ready to animate, I wanted to get a rudimentary lighting pass done, as I knew it was another critical, tricky step that I would likely need assistance and feedback on, so better to get it started now.
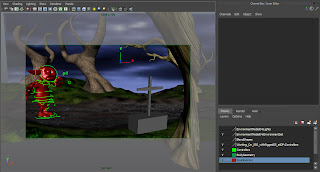
The first lighting pass was problematic - some of the lights didn't want to work properly, I was inheriting lights from the previous rigging file that weren't visible in my scene view but overpowered everything in my render, and the shader for the goblin had to be rebuilt.
I had a lot of notes left over from last time I built the shader, so it was simple enough to re-link the files and tweak some of the settings to get it in - I need to revisit it soon, however, as the light is passing through the character far too strongly and ruins the effect, causing the little dude to glow a bit.
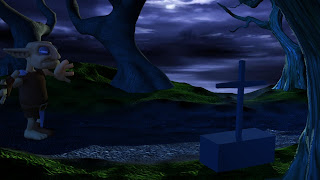
Once that was corrected, I moved him to the point where he'll first stop and see the sword and anvil (the sword and anvil are currently just placeholder geometry - I need to model them both this week, and they don't really have much on them in terms of lighting).
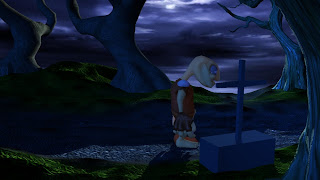
I also put the character into his first real test pose - I will need to revisit a lot of the blend shapes, I've got a handful of them built now and I imported a dozen or so meshes of the goblin to use for other blend shape targets once I get the basic blocking in, as it will be easier to build target sculpts then, since he is a one-off rig.

And that's where we're at for the moment. I'm hoping to get some more of the base poses in tonight, but I wanted to get this blog post up before midnight, and I've got to go to a quick birthday dinner for a friend. All in all, I'm feeling a lot more confident about the scene and am excited about the next few weeks, although there is a huuuuuge amount of animation to get done for this project, and not a lot of weeks left to do it.
I began by building out my basic environment, using a technique I learned last semester in CG300 to create a tree, then duplicating it and tweaking it to create a second. Essentially, I built a cylinder, then used a number of latices and nonlinear bend and twist deformers to create the central trunk, then duplicated that shape and scaled it and twisted it to create the branch shapes. I then cut the hole for the branch in the main trunk and combined the meshes, using target weld, and pushed the combined verts around until I had the shape I wanted.

I then exported the tree from Maya into Max and unwrapped it, as I prefer the pelt and relax unwrap tools available there to Maya's unwrap options for organic shapes. I had a good wood bark photo in my reference library that I converted into a tiling texture, then applied it to the re-imported tree shape in Maya, repeating the bark texture as many times as needed to get the scale to look right.

Once that was done, I exported the ground plane into Mudbox to sculpt it, creating a roadway sunk into the ground and a slight valley where the main action was going to play out in the scene, allowing the sword and goblin to break the horizon and be silhouetted against the sky. I then re-imported this into Maya and got it placed where it needed to be.

I then brought in a tree from a previous project to save time and add variety to my scene, one that had been sculpted in Mudbox - it is a bit higher poly then I'd like, but it will look great rendered, and I can always render the background plate separately from the foreground elements, since the lighting won't move - this will likely be a necessity once I get the high-poly grass laid in. I also brought in a copy of the goblin's mesh, to make sure the scale was going to work well. I blocked in the camera and deleted any of the polys from the foreground tree that weren't going to be part of the final render, to cut down on excess geometry,

Finally, I got the textures set up for the ground plane and new trees, as well as the sky background. They're still not perfect, but they're looking okay so far. As I mentioned previously, I'll be painting in high-poly grasses in the foreground and background to help add a better finished look to the scene and create a more realistic environment, but for the blocking phase this is unnecessary, as it creates a huge overhead for rendering and file size, and makes it very difficult to work on the school's sub-par 32 bit systems as they tend to choke on high-poly scenes. I'll likely end up adding the grass fairly soon and making sure it is on a separate layer, so I can turn it off when I don't want it in the scene. It will also make the rendering process easier, having them out of the way.
I also brought in the fully rigged character model at this time, so I could begin test renders. This was a tricky process, as I often lost a lot of the shader information or rigging if it wasn't done correctly. I ended up spending an hour or two cleaning up old garbage left behind in both scenes, lots of hidden geometry and rigging artifacts that aren't used and won't ever be used, to facilitate the process. To get the merge to work best I ended up importing the environment into the rigged character file, rather then the other way around, then going through and carefully removing and renaming things that may present problems in the future.

Once I had the two files properly merged, I had to spend some time fixing some rigging issues and adding the last few controllers I needed for the rig that had gotten missed previously - in particular, I had somehow neglected to add nurbs shapes for controllers for the loincloth and ear joints. Once I had them in place and the model was ready to animate, I wanted to get a rudimentary lighting pass done, as I knew it was another critical, tricky step that I would likely need assistance and feedback on, so better to get it started now.

The first lighting pass was problematic - some of the lights didn't want to work properly, I was inheriting lights from the previous rigging file that weren't visible in my scene view but overpowered everything in my render, and the shader for the goblin had to be rebuilt.
I had a lot of notes left over from last time I built the shader, so it was simple enough to re-link the files and tweak some of the settings to get it in - I need to revisit it soon, however, as the light is passing through the character far too strongly and ruins the effect, causing the little dude to glow a bit.

Once that was corrected, I moved him to the point where he'll first stop and see the sword and anvil (the sword and anvil are currently just placeholder geometry - I need to model them both this week, and they don't really have much on them in terms of lighting).

I also put the character into his first real test pose - I will need to revisit a lot of the blend shapes, I've got a handful of them built now and I imported a dozen or so meshes of the goblin to use for other blend shape targets once I get the basic blocking in, as it will be easier to build target sculpts then, since he is a one-off rig.

And that's where we're at for the moment. I'm hoping to get some more of the base poses in tonight, but I wanted to get this blog post up before midnight, and I've got to go to a quick birthday dinner for a friend. All in all, I'm feeling a lot more confident about the scene and am excited about the next few weeks, although there is a huuuuuge amount of animation to get done for this project, and not a lot of weeks left to do it.
Wednesday, March 23, 2011
Zbrush - Nazi Dino Progress, part 3
Got to spend some more time working on this guy. Going to try to push and get the base model done tonight, if possible, so I can focus on the armor and gun platform this weekend, if I can get enough of my other homework out of the way.

Started working on the back leg by setting up a series of poly patches just below the knee - I wanted to establish the geometry around the lower leg all the way around, so that I could ensure it flowed into the existing edge loops on the rest of the model.

I continued this process, getting the general silhouette of the leg established - I can pull and push the verts as I need to get the overall shape correct soon enough, but for this stage I needed to make sure I at least had the basic geometry there to work with, and the right shape in at least one dimension.

Then I worked on connecting it to the existing body topology and started working on fleshing out just the most basic part of the anatomy - I know this isn't correct yet, but it is at least starting to form the shapes I need. Using the three-view, with the top and right views on the left hand side and a perspective view I can tumble around the model on the right ensure that it will look decent.

Finally, I connect the leg to the rest of the body, filling out the thigh. I'll correct the edge flow momentarily, but at first I just want to make sure I have the polys and edges all working right, keeping the entire model in quads to ensure perfect subdivision for when I bring it into ZBrush.

Then I connect the back around and start extruding out the tail. This got a little tricky until I figured out where the 5-pole needed to be to allow the edge loops to split away from each other and allow the right shape for the tail.

Here I keep pulling out more and more loops to form the tail - right now, there's more then I really need, but I can pull some out as I go - right now I wanted to make sure I had the basic loops to form the belts. When the time comes, I'll select those poly rings, extrude them out to form the belts, and then separate them out to create their own geometry - this way I know they fit snug to the shape of the model, rather then trying to duplicate the organic shape by hand, and I can remove the loops used to create the belts on the tail itself at that point. Additionally, having the belts as their own geometry allows easier sculpting and subdivision, as I can add the loops necessary to protect their hard edges without requiring the same issue on the tail.

Finally, a quick screen grab of the model in its most recent state - I am widening out the rib cage and still need to work on defining the anatomy under the skin on the back legs, finish out the feet and leg thickness, and I've got a lot to do for the crest, but things are progressing pretty well.
Hell yes, dinosaurs.
Tuesday, March 22, 2011
Zbrush - Nazi Dino Progress, part 2
So I got to spend a couple hours updating and revising my dinosaur model today, refining the head and closing it out.

I started by building extruding out the planes around the eye, then shaping the lid to match the contour as it would in real life. For the eyeball, instead of using a standard sphere geometry - they terminate in triangles at the top and bottom, which don't subdivide well, leaving an irregular point - I took a cube and subdivided it into a sphere, ensuring the shape was entirely made of quads.

Here I've continued to finish the sculpting around the eye, getting the lid shaped the way I wanted it.

I then extruded out more planes to complete the cheekbone ridge and start the upper beak. The beak itself still needs a little more work to complete, as it isn't a great job of maintaining the edge loops around to the inside, but it is a complicated area that has a lot of geometry running into a very small area, so I wanted to try to avoid having it get too dense.

Finally, to check my work I set up a Nurbs modifier to simulate the initial step of subdivision and set up a basic pass at smoothing groups. I still need to insert edge loops around the collar to preserve the hard edges and I have a lot of work to do to complete the ridge and the horns that will be extruded out of it, but for a couple hours I got a lot of work done.

I also spent a little bit of time revising the shoulder area, getting a little more muscle definition in. The bulge around the elbow needs to be removed, and there's still a ton of work left, but I'm excited about the project so far - I always love this phase of a project, the exploration and learning process.
Monday, March 21, 2011
Zbrush - Nazi Dinosaurs are a huge thumbs-up
So this week I began the process of quad modeling the base mesh for my next ZBrush sculpt in my digital sculpture class. We were supposed to create concept art for a quadruped creature, preferably with a mix of hard and soft surfaces. Immediately, my mind went to "awesome dinosaur with huge ol' guns on it", because... well, because it is awesome. I found lots of great stuff from the old Dino-Riders cartoon for inspiration, and then came across this beauty.

It was created for an upcoming game, Dino D-Day, for release on Steam for PCs April 8th. Man, I fell in love. It is fantastic concept art, wonderfully tied down and realized (I do wish it had a better front view with the whole anatomy, but who am I to complain?). I know I'm not skilled enough to create the concept art to this level, so I spoke with my instructor who said that if I can contact the developer for the game, he'd give me permission to use the art for the project.
I did some research, found the contact email for the developer and sent off an inquiry. The next morning, this email was waiting for me:
So awesome.
I began the research process, looking up as much reference as I could, gathering images and articles from across the web. I gathered images of Styracosaurus, Triceratops and similar dinosaurs, focusing on anatomical reference, scale and color patterns and images to help inform me of their shape - in particular, how the back of the neck connects with the back of the crest, and how their legs are shaped from the front view, as well as general shape were it not wearing a giant mobile gun platform. Also, I looked up similar animals, such as the rhino, and gathered information about how to go about building out the topology, especially around the shoulders, as it would need to deform well, and I've never built a 3d model of a quadruped.


Additionally, in my research, I found that the original piece was created by an artist named Ben Mauro, a former student of DigiPen. All the more reason to really try to nail this project.
With all the research in place, I started the modeling process, using the side view to patch model out the basic topography of the first bit of the dinosaur, then pulling the geometry into place to begin forming the contours.


At this point, my friend Mario Toon gave me some tips on modifying the topology around the shoulder, ensuring the edge loops run concentrically around them to help deformation, should I end up animating the model. Taking his advice, I removed a copy of the front leg and got to work fixing the problem.

I then finished out the basic shape of the front leg - it is going to need a lot of revisiting soon, to get the musculature and shape correct, but at least the topology is all there.

I'll post more as I get the model further along, but I've got other projects due soon that need my attention.

It was created for an upcoming game, Dino D-Day, for release on Steam for PCs April 8th. Man, I fell in love. It is fantastic concept art, wonderfully tied down and realized (I do wish it had a better front view with the whole anatomy, but who am I to complain?). I know I'm not skilled enough to create the concept art to this level, so I spoke with my instructor who said that if I can contact the developer for the game, he'd give me permission to use the art for the project.
I did some research, found the contact email for the developer and sent off an inquiry. The next morning, this email was waiting for me:
Hi Matt,
You have my permission to use our concept art for your project. Thanks for the high praise.
The only request I have is that you don’t show us up! This model’s already built and will soon be unveiled when the game hits Steam at the end of the month.
Best of luck. Send me some pictures when you get it finished!
Abe
So awesome.
I began the research process, looking up as much reference as I could, gathering images and articles from across the web. I gathered images of Styracosaurus, Triceratops and similar dinosaurs, focusing on anatomical reference, scale and color patterns and images to help inform me of their shape - in particular, how the back of the neck connects with the back of the crest, and how their legs are shaped from the front view, as well as general shape were it not wearing a giant mobile gun platform. Also, I looked up similar animals, such as the rhino, and gathered information about how to go about building out the topology, especially around the shoulders, as it would need to deform well, and I've never built a 3d model of a quadruped.


Additionally, in my research, I found that the original piece was created by an artist named Ben Mauro, a former student of DigiPen. All the more reason to really try to nail this project.
With all the research in place, I started the modeling process, using the side view to patch model out the basic topography of the first bit of the dinosaur, then pulling the geometry into place to begin forming the contours.


At this point, my friend Mario Toon gave me some tips on modifying the topology around the shoulder, ensuring the edge loops run concentrically around them to help deformation, should I end up animating the model. Taking his advice, I removed a copy of the front leg and got to work fixing the problem.

I then finished out the basic shape of the front leg - it is going to need a lot of revisiting soon, to get the musculature and shape correct, but at least the topology is all there.

I'll post more as I get the model further along, but I've got other projects due soon that need my attention.
Sunday, March 20, 2011
PRJ350 - Week 9 Progress Journal
It has been an interesting, hectic week. I had to miss a couple of days of school due to being in a friend's wedding, which was a very welcome break from the constant hustle, but it put me behind my projected schedule - one that was already starting to slip from where I wanted it to be. Additionally, the Redmond Digital Arts Festival took place this Saturday, and while I got a lot of drawing for my animatic done during it, it did take up a lot of time that could have been spent in Maya polishing the skinning and getting the initial environment completed. Regardless, it was easily worth the time, because I got to hear incredible lectures and presentations from artists like Bay Rait, Chris Taylor, Stephen Stahlberg and Ryan Woodward. Amazing, inspiring stuff.
Additionally, until Tuesday I was expecting to be interviewing for a job position on Thursday. Luckily, I received a call to reschedule it for the 31st of this month, which was an enormous relief.
Despite all these spectacles this week, I did manage to get a lot of work done, including getting a basic timed animatic completed. It still has a small number of little beats that can get worked out, which will help me tell how well the timing is working, as I'm not entirely sold on it yet, but it is well within the realm of my capability this week, as I plan on powering through the last little road blocks, getting my environment blocked in and getting the first couple of poses actually in Maya this week. I've got a couple of stumbling blocks to overcome for other classes (namely, another big milestone due for CG350, a project I still need to update this blog to reflect), but the pipeline for it is in place and I have no doubt I'll be able to get caught back up.
Much of my time this week was spent revising and tweaking my rigging options and getting the skinning in place. It still needs some work - the belt and the shoulders, in particular, have problems, and I realized I need to set some driven keys for one of my foot controllers that somehow got missed, but it is simple enough to do.
Anyway, with everything I had going on, I didn't get a chance to get a lot of screenshots this week, but I have the animatic available below.
Subscribe to:
Posts (Atom)